Slip Jig Walking Sinker
A snag-free sinker you can make for pennies
It’s been a goal of tackle makers to make lures and tackle “weedless” or snag-resistant. Many have accomplished this to a certain extent, but no one has ever mastered it. Things still get snagged and caught in the weeds; it’s the nature of the sport. Let’s face it: If you aren’t getting snagged or caught in the weeds now and then you probably aren’t fishing properly, and worst of all, not catching as many fish as you should be.
So there are times we need put our gear into “four-wheel drive” and get into the rough spots and catch some fish.
Many years ago I discovered Carolina rigging on Lake Michigan for trout and salmon and also for smallmouths in the Sturgeon Bay area—it’s a deadly technique. On Lake Michigan, you can use fluke-type plastic baits or even dead alewives or alewife fillets. For Sturgeon Bay smallies, the lure was small imitation crawfish or tubes swept along the bottom.
Beyond those two applications, bass and walleye anglers have used this method for years to deliver lightweight lures to deep water. For bass anglers everywhere, a Carolina rig towing a 6-inch plastic lizard has been a standard. For walleyes, Lindy rigging is not much more than a walleye version of the Carolina rig. As many of the bass pros call it, the “Ball and Chain” is sometimes a pain in the butt to fish, but a necessary evil for those working lures or live baits to the depths.
If you haven’t been introduced to a Lindy or Carolina rig, let me give you a short introduction.
Your main line is thread through what is normally a large egg sinker. They are generally 1/2 to 1 ounce in weight. This rig is usually fished in 20 to 40 feet of water, so the weight is generally needed to keep good bottom contact. Through the sinker, the line is tied to a swivel. After the swivel, 3 to 5 feet of line (usually fluorocarbon) is tied in and then the lure or bait is added; no other jigs or weights are added. The attractiveness of this rig is that the lure on the end is free-floating, darting or falling in an “injured” manner. You lob the rig out and let it get to the bottom. Then with 3- to 6-foot sweeps you move the sinker, allowing the lure to settle while watching the line intently. When the slightest twitch is detected, make a big sweeping hookset—fish on.
It works incredibly well, but there is a catch. In certain circumstances, you lose a lot of rigs on the bottom. In some situations, like the Great Lakes, it can become maddening. I hate rerigging, and in certain areas I would be re rigging after five to ten casts.
You can be among the first to get the latest info on where to go, what to use and how to use it!
I had to figure something out.
Into the workshop I went, and armed with my arsenal of Do-it Molds, I was determined to figure out a solution. It took a few ideas, but I came up with a simple, easily made walking sinker system that is nearly impossible to snag, even in the most snag- infested areas.
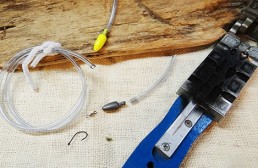
The system starts out with the Do-it model SLIP-6-A Slip Jig Lure Mold; I can’t even begin to tell you all the uses there are for the slip jig weights. They are a bullet worm sinker with a collar molded on the back. You can Texas rig worms with it. Add a rubber skirt to it and fish it like a bass jig. You can clip off the collar and just use it like a worm weight. And you can clip off the collar and make spinner bodies with it. Tie a bucktail on it with the weight forward or reversed with the weight hidden in the hair and make muskie and pike spinners too. With six cavities ranging from 1/8 ounce to 9/16 ounce, the possibilities are endless with this mold. And this mold comes with a pull-pin, so when you cast the weight with the pull pin in place, you pull it out as soon as you cast the lead, leaving you a smooth hole down the middle for your line. So, just pour some 1/2- or 9/16-ounce Do-it Slip Jigs.
The next thing you will need is a pack of standard plastic, flexible airline tubing that is used in aquariums. If you have an aquarium store near you they will have it or any big box store that has a pet department will have it. It’s clear and comes in a 10-foot coil for about $2, and that should last a long time.
Cut about 3 1/2 inches of tubing. It will have a slight curve to it. Don’t try to straighten it; the curve is good. You will notice that the diameter of the tubing is the perfect diameter for the collar of the slip jig weight. Slide the tubing on the collar. You have just made the most snag-resistant walking sinker/Carolina rig sinker that I have ever used—bar none. I have thrown this into areas where I have tried to snag it and I can’t. On Lake Michigan, I went from snagging 10 rigs per morning to snagging one or two per year. It slides over gravel, rocks, zebra mussels, logs, bottom weeds—you name it. The curve of the tubing keeps it riding nose-up like the end of a ski.
To rig it, you have to first run the line through the tubing, then through the collar-end of the slip jig. Then slide the two together. Now add your swivel, leader and bait or lure.
I rarely even paint the lead, but I know a lot of walleye guys like the color on the sinker, so a good coat of powder paint is welcome.
Bottom rigging with live bait or Carolina rigging with soft plastics shouldn’t be a constant snag-and-retie situation. This simple rig, using the Do-it Slip Jig and some inexpensive aquarium tubing, will keep you amazingly snag-free under almost any situation. And on top of that, the Do-it Slip Jig Mold has so many other applications that the investment on this mold is a no-brainer—plus, it’s always so much fun to catch a fish on a lure or rig you made yourself.
Did you enjoy this post?
You can be among the first to get the latest info on where to go, what to use and how to use it!