Reading a New Lake
Working a new lake can be simple if you “read the water” and watch for signs. Without any technology you can go to any lake’s shoreline and increase your chances of catching fish. You don’t necessarily need a boat to have a great day of fishing either. With these tips, I will use some high-tech gear and age-old techniques to help you read the lakes.
Conditions change, water temperatures trigger fish movements, and behaviors switch. You might hear about fish being caught on your lake one day, and the weather will change the fish location, depth and behavior, so you need to be able to read the water.
Fish will give you signs of what they are up to—or what they are not up to. Lakes are easier to read when they are calm, so you are better off getting a look at the water early before the day’s wind takes hold. Wind is usually lighter in early morning, but can pick up by 9 or 10 a.m. If you get to a lake even by 8 a.m., you will be more likely to see where the fish are active and they will “show” you the lake areas you need to watch for. Surface activity will occur at the edges of fish-holding contours and structures.
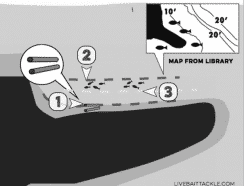
You can get information online on lakes, including contour maps, fish crib locations and road maps. This will help you prepare. I downloaded a map easily. Getting information will help you get the early read. In my lake example, I searched for a map showing fish cribs in nearshore areas, so I knew where I was going to target—a fish crib. This is a sunken timber “box” or fish corral that literally holds fish, hides them from predators and attracts food. All fish cruise in and around these. Fish live on the structure and in between the log walls year ‘round.
Arriving at the shore with three fish cribs, I knew the roads leading to this area and the basic depth. The depths I saw on the map had me fishing between 6 to 10 feet of water. Prepping for this spot, I would confidently pack multiple baits, including spikes (small white maggot larvae), red worms and crappie minnows. It is good to keep your bait small to match the fall minnows up until June or July.
Checking the weather will help you pick out the best floats you will use. In any fishing condition, adding shot to have the float ride low and getting exact depths will score many fish. I shot two types of float up at home and remember to leave a little float above water for the bait (or swimming minnow). Selecting the smallest floats and weighing them down to match the bait make a difference. If the bite is tough, you can still outcatch everyone around you. On the day I was researching this article and following these steps, eight people caught zero fish around me, while I hooked into 23 fish.
When I arrive at a spot, I move slowly and watch the water for any signs. On my spot, I could immediately see small minnows in a line of activity across the water. I didn’t see any bubbles or jumping fish. I took some time to watch the water before walking all the way up to the edge. Don’t be in a hurry to get to the edge of that water—stay back, stay low and stay quiet. You will discover where different activity is and this time will help you put your bait right in the active fish. From watching the minnows work, I also saw the slurp of a crappie and the distance from shore where the minnows began, ended and where the fish struck.
I cast out with a plummet (small weight and cork) that I cannot fish without. Reeling in, I can watch the float depth and check to find three depths I want to fish and the changes in depth. I find depths away from the crib so that I don’t get snagged. When you fish a crib structure you want to fish the sides at the height of the crib. A small, thin float is the best way to suspend the bait at these depths.
You can be among the first to get the latest info on where to go, what to use and how to use it!
With a school of minnows, there will be fish located at least in two depths. With a visual in my head of the lake contour, I will fish the first drop, the inside edge of the minnows and the outside edge. One rod is set to fish the suspended fish at crib-top height and the other will be fished just off the bottom. These will take care of fish below and above the minnow school. If you start to catch more at one depth, change both rods to the same “hot” depth. If the action picks up, put one rod away as a spare. Watching one hot rod is better than messing up or fishing with two sloppy rods. You will be faster and hook more fish using one rod. You also will tangle less, and catch more, becoming a better fisherman. It’s best to fish one rod well than two rods poorly.
During my lake-reading session, I caught fish at three depths and at two distances. The contour nearest to shore was good and the inside top edge of the crib (above the minnows) worked best for crappies. Down lower, at the base of the crib, I caught perch and bluegills. The two largest fish were caught suspended. I took the time to get a sonar picture of the area to give a clear illustration of where I was. The picture was taken with a “castable” sonar that connects to my smartphone.
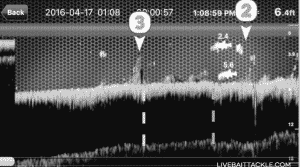
In the sonar illustration, you can see an electronic look, confirming the choices we made.
You can also see inside and outside edges of the fish crib. You can also see the minnows suspended above the crib and see fish suspended below the ball of minnows. The crib has busted apart and is a lot lower; boaters drop their anchors in these and tear them up, changing the shape. The crib is the shape coming from bottom and then the hard edge. Note the minnows and fish are on the downwind side of the crib.
When I was reading the water without the sonar, I noticed two of the crib logs had washed up onshore, pulled apart by boat anchors or ice.
I did catch fish on the deep side of these logs too. When I was reading the water, there was also a hatch of midge fly larvae. No doubt, the minnows were out feeding on these insects and the fish were then feeding on the minnows—the circle of life.
The next time you go fishing, take the time to read the water. The preparation will result in you catching more fish.

Did you enjoy this post?
You can be among the first to get the latest info on where to go, what to use and how to use it!