From the Shot to the Wall: Keyes to a Great Mounted Turkey
SHARE THIS POST
Whether it is your first bird or not, or your next bearded hen or largest tom ever taken with a bow, shotgun or crossbow, you might find yourself having one mounted by a taxidermist this spring. However, before you take your bird to the taxidermy shop, here are some important things to consider in order for the mount to reach its full potential.
Shot selection
On opening day a few years ago, I saw a bearded hen with a group of other hens feeding in the plowed field near my tent blind. Considering that a bearded hen is extremely rare—according to studies, 10 to 20 percent of hens grow beards—I made a decision that I would try and shoot her if given the opportunity during next day’s hunt. Sure enough, the bird showed up, just like clockwork, offering me a 15-yard shot. I couldn’t wait to go and retrieve the bird. However, upon arriving, my heart sank. Somehow I had shot too low, damaging the upper region of the breast and trimmed off most of her beard except for a few strands. My fiancé, who was hunting with me at the time, helped me find most of the strands spread out across the ground and placed them in a bag.
Unfortunately, there is really no good excuse, except that I rushed the shot. Hopeful, I thought that a taxidermist would be able to fix it. However, when I took the bird to a local taxidermy shop, the owner instantly said that he would not be able to do a full-mount of the bird because the feathers were too badly damaged.
Sometimes even the most talented and gifted taxidermists aren’t able to wave their magic wand and fix a shot-up bird. With that said, I hope that none of you ever have to go through the same painful scenario while turkey hunting. To help you avoid the same mistake, here are some tips for choosing the best shot possible.
When using a shotgun to hunt turkeys, always wait for a head-and-neck shot at a distance of around 20 to 30 yards. This will help ensure that the pattern of your shot will be spread out and not concentrated in one particular spot, which could potentially cause damage to the bird. Placing the bead or scope crosshairs just below the head will put a turkey on the ground. If a tom is fanned out and facing you head-on, wait for it to turn broadside to avoid damaging the tail feathers with your shot. Otherwise, your hopes of having either a full mount or tail fan display will vanish. One way to stretch out a turkey’s head for a clean shot is to let out a series of cutts on a turkey call.
If you decide to hunt turkeys with either a compound bow or a crossbow, and would like to have a full-mount of the bird done, the best place to aim for is broadside, at the base of the turkey’s wing. This particular shot will help prevent the bird from flying off and also from penetrating the vitals for a fast recovery with minimum damage to the bird.
The growing trend lately for bowhunters is to take a head shot using a wide broadhead. This type of shot is great if you plan on having a tail fan/beard display, but for full-mounts with a freeze-dried head, it should be avoided.
Field care
After the shot, there are some important steps that you need to take to help protect the turkey for the taxidermist. First off, you need to keep its feathers clean and dry. This can be challenging at first because when you shoot the turkey there is a likelihood it will flop around uncontrollably for 30 seconds or so. I have in the past tried to restrain a flopping turkey to help prevent the feathers from becoming soiled or falling out. However, if you decide to do this, be extremely careful of the bird’s sharp spurs. Once it stops moving, stuff some cotton balls or paper towels in its mouth and anus to help prevent blood and fecal material from staining the feathers. If you find dirt or blood on the bird’s feathers, dampen some paper towel with water and gently wipe it off. Sometimes feathers become dislodged during the flailing period. If so, pick them up and save them; the taxidermist will be able to use these later on depending on what type of mount you choose.
Are you enjoying this post?
You can be among the first to get the latest info on where to go, what to use and how to use it!
Before transporting the bird from the field, place it either inside of a large game bag or a plastic bag, being careful not to bend the feathers in any unnatural position. Nick Giuliani, taxidermist and owner of NAC Taxidermy near Mt. Pleasant, Mich., suggests folding the bird up in its wings and then grooming all of the feathers so that they lay naturally. Then it is time to head either straight to the taxidermist or place it in the freezer.
Finding a taxidermist
You made a good shot on a turkey and went to great lengths to protect the bird—now it is time to find a reputable taxidermist that will properly preserve it.
There are numerous ways to find a skilled taxidermist and see examples of their work before committing to one. These include online, booths at hunting shows, magazines and information boards and mount displays at hunting stores. Besides these sources, nothing beats visiting a taxidermist’s studio to see their work first-hand. This is also a great opportunity to find out pricing information and what types of turkey poses they offer before making a final decision. Another way to confirm their credibility is to find out if they have won any awards at taxidermy competitions, or regularly attend conventions, which help them improve their craft.
“Hunters should choose a taxidermist by looking at the work in the taxidermist’s studio and comparing it to photos found in a turkey hunting publication,” says R.J. Meyer, master taxidermist at The Trophy Room Taxidermy studio in Clare, Mich. “Freeze-dried heads (real head) are so much better looking than a cheap plastic one, which some taxidermist’s use. Nothing looks more ‘plastic’ than plastic. Bad or poorly done turkey mounts are responsible for more bug infestations of trophy rooms or homes than any other mount. The problem lies in the preserving of the tail of the bird. If your taxidermist simply scrapes the fat a bit and rubs salt or borax on it, you will get bugs eating on it. A good taxidermist removes each tail feather, cleans it and reattaches it. As with most things, price is often (though not always) an indication of the skill of the taxidermist. Everyone knows what their work is worth.”
Turkey poses
Choosing a turkey pose can be a challenging decision to make based on the fact that there is such a variety available today to choose from. Most taxidermists offer the customer several different pose options, which include strutting (full strut, 3/4 strut or 1/2 strut), walking, standing, gobbling, roosting, flying, hanging dead and tail and beard displays.
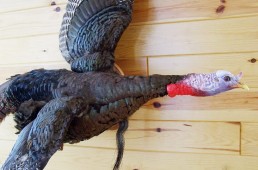
A few years ago, I walked into a taxidermy shop and noticed a flying turkey displayed on the wall. At that moment, I instantly chose that particular pose for my mount. Before deciding on a pose, there are several different things to consider: If your shot damaged part of the bird, then you will want to choose a pose which hides this area. For example, if a broadhead caused excessive damage to one of the turkey’s wings, you would want to choose a pose that helps conceal the area. This could be the side view of a full-mount, which is standing, strutting or gobbling where the bad side is facing toward a wall. This is where the taxidermist will help offer suggestions that will do your mount justice. Other factors should be your budget and the amount of available floor or wall space in your home.
This spring, be prepared to walk out of the woods with a longbeard for a taxidermist. You can be confident knowing that the bird you shot is in good hands. In a few months, you will pick it up and have a quality mount that will capture fond memories of the hunt.
MWO
SHARE THIS POST
Did you enjoy this post?
You can be among the first to get the latest info on where to go, what to use and how to use it!
Darin Potter
Darin Potter’s passion for outdoor writing began at the age of 12 when he first began writing in a journal that his parents bought him on a family camping trip in Northern Michigan. His writings have appeared in several Midwest publications: Michigan-Out-of-Doors, Michigan and Ohio Outdoor News, Modern Pioneer, and MidWest Outdoors.


I love that post Darin best uncle ever!