Trail Camera Tips and Tricks
Early trail cameras from the 1980s were slow and only flash models were sold. The trigger devices were not reliable, picture quality was often poor and you had to wait to develop your 35mm film to find out what happened. I can’t tell you how many rolls of images of nothing I developed.
“Necessity is the mother of invention,” as they say. Most technologies have a breakthrough that is suddenly user-friendly—for trail cameras it was “digital photography.” Film cameras that were limited to 36 shots were replaced by digital cameras capable taking hundreds of shots. There were no more trips to the film processor and trail camera enthusiasts were able to instantly view their pictures on the camera or a computer via a screen.
Infrared flash was another big step forward, and now we have HD video, time lapse and wireless connections so you can view images seconds after they are captured. Trail cameras today come in all shapes and sizes, and range from the more complicated and expensive to the very basic and affordable.
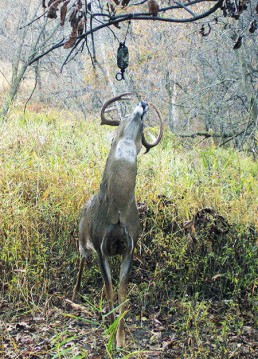
Digital trail cameras offer the choice of shooting still photos or video clips. Different settings for sensitivity, multi-shot and video length allow the user to capture shots in a variety of situations. I especially like the video setting when monitoring a scrape; it’s fascinating to see the ritual up close when a buck is freshening one.
Test for success
Trail cameras come with specifications that suggest its performance, such as flash range distance, trigger speed, etc. Most of them are fairly accurate, but I still like to test new cameras; it really helps to understand under what conditions that camera will be best used.
Mount the camera in your yard, and starting at the camera, walk directly away from it and mark off every 10 feet until you’ve reached 50 to 60 feet. Now turn the camera on in an auto-shooting mode and walk off to one side. Walking at a normal pace, pass through the “trigger area” at each marker, giving the camera the appropriate recovery time after each shot. Then repeat the test, walking at quicker speeds until you’re moving at a trot. If you have kids, let them do the running. Pull the card and check the images. One of the shots will be focused better than the others. This distance is the camera’s standard focal length, something to keep in mind when you set the camera in the field. If the camera was able to capture you at fast speeds, this model is a quality camera and good to use on field edges, funnels or trails where you’ll encounter walking deer. If the trigger is slow, the camera is best used on scrapes, feeding sites or mineral licks where it will have no problem capturing standing deer.
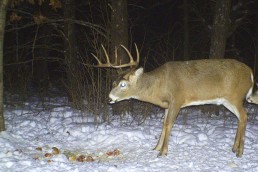
You may want to repeat the same test at night to see a real-world look at the camera’s flash range, nighttime focal point and speed. The night test will also give you an idea of how bright the camera’s infrared sensors are. These tests reveal which models work best under certain conditions.
Choose your spot wisely
One of the best places to capture deer photos with a trail camera is a feeder, but other good places are scrapes, trail intersections, fence crossings, a “hot” oak tree dropping acorns, mineral licks and food plots.
Trigger speed is not a big issue at most food sources, as animals spend time here and should trigger the camera often. Center the food source in the camera’s field of view. The optimal effective range of most cameras is about 20 feet. The best height to set the camera depends upon a number of factors like direction of the sun, small animals present that you don’t want to trigger the camera, a trespasser who might like a new camera if they can reach it or if you are hanging the camera on a tree, fence post or commercial tripod, etc.
You can be among the first to get the latest info on where to go, what to use and how to use it!
In most instances it’s best to point the camera any direction but south, into the sun. This helps eliminate sunspots or any glare during daylight. Also, remove any brush, grass or limbs that can move with the wind and trigger the camera. These objects may distract from the photo’s subject anyway, so take the time to eradicate them.
Setting up on a trail or crossing requires different settings and positioning for the camera. Animals passing quickly challenge the camera to “wake up” and trigger before it is out of the field of view, often resulting in empty frames. To correct this, point the camera at a 45-degree angle to the trail or crossing. This keeps the animal in the field of view longer and should result in fewer blank frames or shots with only half of the animal.
Play it safe
It pays to be careful, and sometimes sneaky, when setting cameras. I don’t like to set the camera too close to a scrape, mineral site or anywhere else a whitetail may focus on. One of my favorite tricks when setting a camera at such a location is to mount the camera 5 or 6 feet up on a tree, leaving some slack in the strap. Then, carefully jam a stick behind the camera to angle it down on the site. Whitetails may not see the high-mounted camera, and if they do happen to see a light from a flash or infrared sensor, it doesn’t seem to bother them as much as if a blast goes off a few feet away at nose-level.
Choose a camera that has a quiet shutter. If you get lots of photos of the animal looking right at your camera, you probably have a loud shutter. The quieter your camera functions, the better.
It cannot happen at every site, but I like to position cameras so I can drive right up to them and change cards right off of my ATV. An ATV can be less intrusive than a human on foot. In addition, I leave virtually no human scent at the site.
When hanging the camera, if possible, I like to replace the original mounting strap with a small bungee cord with hooks on both ends. Some of the camera manufacturers give you straps that could double for the seatbelt in your car. Now you have to “bear hug” the tree and try to fling the “seatbelt” around the trunk. The small rubber cords are faster and easier.
Finally, minimize the impact of camera setups by checking cards as little as possible. New SD cards can hold thousands of images, so there’s no need to swap cards or pull cameras more than once a week unless you need “MRI” (Most Recent Information). Time your visits for midday and set up a route where you check all your cameras on the same day, simultaneously from the same direction. Some feel this may condition the deer to their presence. But even if a buck hears or sees one coming, he won’t be alarmed because the practice of checking the specific camera matches the “normal” activity on the given property.
Trail camera pictures and videos offer insight into what is truly out there on your property. They may inspire you to hold out for a specific buck and give you valuable data to help make management decisions from one year to the next. And truth be told, trail cameras are a fun hobby all on their own.

Did you enjoy this post?
You can be among the first to get the latest info on where to go, what to use and how to use it!