
Summer is the Time to set your Trail Cameras
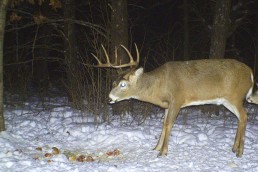
While turkey season is a distant memory and venison sausage supplies are nearly exhausted, many hunters know the next deer season has already begun. Hunting doesn’t always require a weapon. In many instances, the best way to hunt an animal is with a camera. Even on small acreages, you should take the time to find out which animals made it through the winter. Using a trail camera can do this easily and effectively.
These are simple to operate and can give you the insight you need to get ready for fall. Today’s digital cameras and high- capacity SD cards allow you to get thousands of pictures on a single card. And the efficiency of the newer units will take over 10,000 photos or several hours of video without having to change out the batteries. They can be programmed with multiple settings including how long to delay between pictures, the number of pictures per detection, day and/or nighttime operation and picture quality.
Based on my experience, cameras with 12-megapixel capabilities and the fastest trigger speeds (time from motion detection until the photo is taken) will give you the best quality experience without breaking the budget. This gives you clear photos with the target animal in the center of the photo. A camera with these capabilities can be purchased for around $100. But in the spring and early summer you can find them under $100 when retailers are discounting their hunting gear.
High-capacity cameras are ideal if you have a spot where deer like to congregate, and, more importantly, if you’re worried about spooking the animals. In the past, congregation areas were best to be avoided as the first trail cameras were 35-mm film and cost you about $5 to develop 24, not to mention all the photos that could be used up in a day or less. Those cameras were put on trails between bedding areas and food sources. When you only cover the main trails, you tend to miss the loner animals, which often are your older ones. Digital cameras give you no reason to ever take the unit out of the woods or avoid high-traffic areas.
When you do retrieve your photos, it’s best to have a spare SD card to swap out of the camera. Using two SD cards allows you to get in and out of the area without leaving too much human scent, a key to later success. If money is not an issue, units with cellular service are also available that will send the picture directly to your smartphone. The downside is they are expensive at around 10 cents a photo. It doesn’t sound bad until you see that family group of deer milling around in front of your camera for two hours. The camera sends you a photo every 15 seconds, and then you realize you could have spent that $30 on a new camouflage sweatshirt.
You can be among the first to get the latest info on where to go, what to use and how to use it!
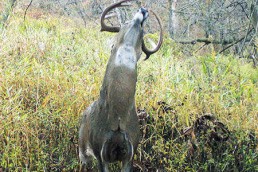
Sitting cameras in the summer is similar when you do so in the fall, but with some minor differences. First, deer are not usually concentrated around food sources like in the fall; foliage is plentiful and deer do not have to compete for food resources. If water is scarce in the area, a deer crossing at a creek or gentle bank on a pond can be great spots to catch some action. Bachelor groups of bucks need water, food and security during this season. Once you find those July and August haunts, you should be able to use them year after year because those group home ranges typically don’t change.
Second, if you are near pastures with cattle, the salt blocks in those pastures can be great spots for trail cameras. You will want to adjust your setting on the camera and use that 32 GB card because you will have 5,000 cattle pictures along with the hundred or so deer photos. Does, fawn, and bucks all will hit these salt blocks, usually at night and when the cattle are not around. If there is an obvious watering spot nearby, add a camera there as well.
Finally, spend some time in the woods and experiment with spots. I typically will give it a week to 10 days, check the SD card while still in the woods, and then evaluate if the camera needs to be moved, if it has potential or if determine if I’ve found a core area. My best summer spot I discovered was by accident after stumbling into a small grove of evergreens with absolutely no sign of deer anywhere. Year after year, I get more summertime buck moment in this locations as well as its fair share of shed antlers in the spring.
Trail cameras can be a great eye opener to what is really going on when you’re not there. I’ve even used them to monitor bird feeders and parking spots at work. For instance, you may discover your neighbor likes to pick mushrooms on your property, you have a resident bobcat, there’s a 180-inch buck you have never seen or someone likes to jog right by your treestand in the fall. I’ve even had the SD cards removed from my cameras after someone apparently “realized” they were trespassing. At least they were honest enough to not steal the cameras. These are all things I’ve learned because I have “eyes” in the woods year ‘round.

Did you enjoy this post?
You can be among the first to get the latest info on where to go, what to use and how to use it!