Make Sure Your Dog is as Ready as Your Gear
You flip the next page of your calendar excitedly to double-check the date of the opener. Your guns have been cleaned at least half a dozen times and your camouflage and blaze orange has taken up residence near the front door—a place it will stay until the New Year. Your favorite blaze orange hat has already taken its place on the dash of your truck and your duck waders are in the back seat. You are positive you are ready to go when the hunting season begins…
Then you think back to an opening day when your dog forged ahead on his own, right before that thicket of young aspen trees and flushed a covey of seven grouse way out of range. Man, your buddies were angry, and you even received some grief over it on that long Fourth of July weekend up north while clearing brush on the hunting land. Oh crap, remember when your dog wouldn’t take a directional cast on that duck your friend sailed into the woods and ended up with a mouthful of porcupine quills? That ruined the entire day of hunting, especially since the migrators were just moving in from the north ahead of the big cold front.
It isn’t too late. Granted, you aren’t going to have a finished AKC field champion by only training for the few weeks before the season opens, but you can fix a few of the problems you saw previously and maybe work on some other thing you have been meaning to teach your dog.
Quick training
Last-minute training isn’t going to work if you feel the need to yell at your dog. Best results are achieved with positive reinforcement. Either use a dog-training clicker, or pick one short word that will let the dog understand that it did the right thing. Above everything else, be consistent. If you aren’t, your dog is very likely to get confused and shut down to further training.
Steadiness in the field is for more than just duck hunters. Having the ability to get your dog to sit and stay in one location until released is always a valuable tool. It could, in fact, save his life. A dog that has a solid understanding of the remote sit can be stopped from chasing deer or hen pheasants across a busy nearby highway, or running himself ragged after a crippled goose in a fast-moving river. To work on this, it’s best to start by teaching him to sit to the whistle. This is a fairly simple concept assuming your dog can crisply respond to the “sit” command.
You can be among the first to get the latest info on where to go, what to use and how to use it!
When practicing your regular obedience for your pet, heeling, etc., simply introduce the idea with a short “toot” of the whistle immediately followed by the command “sit.” As soon as your dog parks his butt on the floor, give him a quick reward and release him. Repeat this several times in a short session. Fast and furious is the idea here—the quicker his butt hits the floor after that whistle, the sooner the reward and release; it becomes a game. After a few sessions, your dog will be making the move to sit before you can even get the word out. At that point you can drop the “sit” command and start working in a little distance between you and your dog. Before you know it, you’ll be able to stop him in a sit from across the field.
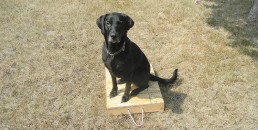
After you have your dog sitting on command, it is time to work on “stay.” Reinforcing this command is best achieved by giving the dog a specific spot to sit and stay. I use a place board, a small wooden box that is raised off of the ground. The reason for using an elevated location to make the dog stay is that the dog is going to have to think twice before trying to cheat off of this location. You don’t need a place board, though. Any elevated location will do, even a picnic table or the tailgate of your truck. Slowly extend the amount of time you have your dog stay in his spot, and if he succeeds, go praise and reward. If the dog moves off of the location, take him back and have him start over.
Another quick command you have time to instill is “come” or “here.” Again, with this command, you are going to be using positive reinforcement, but you will also be using a check cord. A check cord is a long, tangle-free leash used for dog training. Attach it to your dog’s collar, and when he is roaming around the yard, randomly give him the command “come,” then immediately start pulling him toward you with the cord. When he gets to your side, praise and reward him. Work it as a game and you will see the dog get to the point where he will be coming to your side faster than you can reel in the cord. When you feel comfortable with the speed your dog gets to your side, try it without the check cord.
Keep it fun
It won’t all be easy, especially if you have one of those stubborn labs that a training friend of mine once called, “2×4 labs.” These are dogs that are so thickheaded that you almost have to hit them in the head with a 2×4 to even get their attention. However, even the most headstrong dog will respond to excitement in his owner’s voice.
For this training to work in such a short time, you need to keep your dog engaged. If your dog begins getting bored or frustrated with the training, it is time to stop for at least an hour or two. Before you stop the training, give your dog a super easy task. Ending any length of training on a good note will give you and the dog more reason to get back after it. The more fun you make this, the more you will get done; the more enjoyable it is for you, the more your dog will want to learn.


Did you enjoy this post?
You can be among the first to get the latest info on where to go, what to use and how to use it!