Great-tasting Venison, Field to Table
With the deer hunting season in full swing in the Midwest, many hunters are enjoying a great year in the field pursuing that trophy deer they have been dreaming about. Many will be successful in that quest, many not so much. For those hunters who are fortunate to harvest a deer, it’s important to remember that for great-tasting venison in the future, the work must immediately begin in the present. With that in mind, let’s talk about how to get venison from the field to the table.
When speaking with many deer hunters at seminars, it seems that there are still a good number who are not quite sure what is the proper way to process their deer after they have made the harvest.
Well, first and foremost, proper handling of venison will start immediately after you make the kill in the field. To ensure good-tasting meat when it comes time to eat the venison, there are certain steps that should be taken as soon as possible after making the kill.
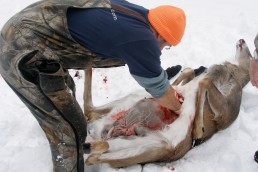
After the kill has been made and all the admiring has been done, it is essential that you field dress the animal’s carcass as soon as you can. Field dressing involves removing the deer’s entrails. Most hunters can do this without much trouble. Now keep in mind, even though most hunters are capable of field dressing, there are a few steps that are very important in ensuring that the taste of the deer meat will remain good and the meat will not become contaminated.
The first and easiest method is known as “bleeding out.” This involves cutting open the deer’s neck and letting the blood flow out from the carcass. To do this, it is important that you have a good sharp knife to make the incision. After the blood has run out from the deer, it’s time to start the actual field dressing.
Note: For field dressing I have found that thin Nitrile rubber gloves, like doctors use, work very well.
A simple way to start this process is to roll the deer on its back. Now, take your sharp knife and starting at the anus, make a straight cut along the stomach centerline, being careful that you cut only deep enough to cut the hide. This is very important since you do not want to accidentally cut into the stomach or the intestines will release the fluids inside them. Continue your cut all the way to the center of the diaphragm. When doing this, use your fingers as a guide to feel for the correct area. You now can easily open up the chest cavity by cutting simply through the breastbone. You should now also make a deep cut around the anus to free up the intestine. After you make this cut, use a sturdy knife or a small axe to split the pelvic bone, which you will see at its center.
The diaphragm, which separates the body cavity and the chest, will also have to be cut free. To do this, simply reach inside and loosen the liver and the heart from the tissue that holds it in place. Now the heart and liver can be removed very easily. If you are one of the folks who keep these organs to eat, simply put them in a clean plastic bag for safe keeping, being very careful not to rupture them.
Next, carefully remove any entrails that are left in the cavity and you’re ready to move on.
With the body cavity of the deer now empty of the entrails, its time to cool the carcass down as quickly as possible to help ensure the meat does not spoil.
For this, you want to wipe the body cavity clean and remove any remaining tissues and also remove any damaged meat areas near wounds. To keep the cavity open while doing this, simply prop a twig across the cut cavity opening to hold it wide open while you work.
You can be among the first to get the latest info on where to go, what to use and how to use it!
An alternative to using old rags is to use fresh snow—if available—to wipe down the cavity. After this has been completed, it’s now time to get the deer home for further processing.
We have all seen in the movies at one time or another how a deer hunter would tie the deer to their fender or put it on the roof of the vehicle for the ride home. Well, this is a big no-no if you’re expecting to have good-tasting venison when you get home. Also, do not place the carcass anywhere close to the vehicle exhaust because the carcass will absorb those nasty exhaust fumes and make your deer taste like gasoline.
If at all possible, place your deer in plastic for the ride home. This will help ensure freshness during the ride and help to keep out all unwanted scents.
Okay, you get that deer home and it’s now time to start the process of aging the meat. For this, you will want to hang the deer in a location that has a temperature range of 35 to 39 degrees. This temperature range has proven to be ideal for aging the meat.
Make sure to hang the deer from a location that’s high enough to keep safely away from any predators such as dogs or coyotes. For best results, hang the deer from its hind legs and use a stick or two to hold the chest cavity wide open so that air can circulate inside and cool the carcass completely. After the carcass has cooled, it’s time to skin the deer.
When skinning, first cut the skin around the back legs and then slit them on the inside of the leg all the way down to the pelvis. Then, pull the hide up while using your sharp knife to do the work. When you do it this way, it skins very quickly. While cutting, try to separate the skin from the meat without tearing it. While you’re doing this, use extra care not to let the deer hair touch the meat. As you move along down and finally reach the front legs, slit them the same way as you did the hind legs. If you are planning on mounting the deer head, make it a point to leave as much cape as possible for the taxidermist to work with. I’ll usually cut behind the shoulders for this and it leaves an adequate amount of cape to work with.
With the skinning all finished, cut the deer into usable portions for the dinner table. For this, I’ll usually divide the deer by cuts of meat. There will be my roast, my tenderloins, etc. How you choose to divide the meat is up to your personal preference.
Before wrapping the meat portions, it’s always best to trim off the heavy fat. The reason is that these fat areas are what give the venison that strong game flavor that most folks do not like. Now, wrap the venison cuts you made in freezer paper and mark each as to which cut it contains and date it. Use freezer paper because the moisture is kept in the meat so that when you go to use it later, it is not all dried out.
I’ll tell you my friends, if you’re looking for excellent venison meat from that deer you harvested, make it a point to start with proper handling in the field. By doing this you will ensure a great-tasting meal fit for a king.
Email your outdoors questions to Mike Cyze at: lastcast13@yahoo.com.You can also check out his blog at: lastcastoutdoors.com or listen to him on ESPN Radio.


Did you enjoy this post?
You can be among the first to get the latest info on where to go, what to use and how to use it!