Ready, Aim…
For over 40 years, Dan’s Fish ‘N’ Tales® has been floating around print and electronic media, sometimes covering subjects other than fishing. Now, “Tales” will have a sister column called “Shoot ‘N’ Plink,” covering subjects pertaining to target shooting. Fish ‘N’ Tales will still be my main focus while Shoot ‘N’ Plink will be on a periodic basis.I’ve always enjoyed target shooting—known by many as “plinking”—and is probably why I also enjoy throwing darts and archery. However, the archery side ended many years ago when I had an ice skating accident that damaged my left arm and made it extremely difficult to properly pull a bow and line up the shots.
But this column is about target shooting and not hunting, and a lot of the subject matter will fall in the .22-caliber line. That isn’t saying there won’t be some other items such as the Big Boy .357 magnum/.38 special. Items also covered will include firearms, styles of shooting, scopes/sights and adjustment, targets, ammunition, cleaning and more. There may also be certain subjects that will touch briefly on conceal carry.
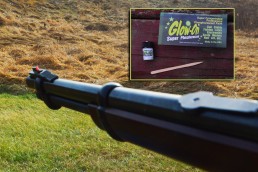
For starters, I’ve decided to include a tip for improving the front sites on any firearm on which you are going to be using iron sights. In my case, it’s my Browning pistols, Ruger revolver and Henry Mare’s Leg, which is classified as a “pistol.”
The main product used will be Glow-On paint, which is applied using the stick provided with the paint, or a toothpick. This product is non-radioactive and non-toxic. And, be sure to shake it before using. Be careful not to paint the barrel. A little masking tape can help eliminate this problem, but with some practice, you’ll be able to be right on the mark with the end of a toothpick or a “fine” painter’s brush. A first coat of paint is sometimes all that is needed, but if not, let it dry for 30 minutes and apply another coat. I’ll sometimes use three coats, but normally two. The paint will dry and have its fullest glowing capabilities in 24 hours.
There are several colors available too. I use their fluorescent Original, Yellow and Bubble Gum Red. The Green is also good. I may try their Blue some days, but at present, that color is saved for the fishing lures. Some will also paint their rear sights a different color; so far I’ve only painted the front. Glow-On comes in a very small bottle, but don’t worry, it doesn’t take that much and it can be thinned with water.
You can be among the first to get the latest info on where to go, what to use and how to use it!
The next step is to help the paint adhere to the metal and make a shiner bead. Glow-On recommends a coat of clear fingernail polish, but I’ve found a product called Bondic, a liquid plastic that can be hardened with an ultraviolet light. I wasn’t sure about this stuff at first with the weird way of using the light to solidify it, but it worked. After the paint is fully dry, use just enough of the liquid plastic to cover the area. Then, apply the light for about 10 to 20 seconds so it can harden properly. If you still feel a little “tackiness” to it, place it in front of a fan. I’m not sure if it always needs this, but the end result is a nicely sealed, glowing front sight.
I don’t need the paint on my Henry rifles, which have a brass bead on the front sight and a semi-buckhorn with white diamond on the rear. With the right tuning, these sights can really hit the mark.
So, I guess it’s time to pull the trigger and launch “Shoot ‘N’ Plink” by completing the title of this column and the cycle:
“… Fire!”


Did you enjoy this post?
You can be among the first to get the latest info on where to go, what to use and how to use it!