Land More Fish via Rod, Reel, Line Maintenance
Many have heard or told fish stories about “the one that got away.” I wonder how often these stories were due to reel or line failure that could’ve been prevented by some simple maintenance. As we leave March and move through early April, I start to get the itch to put away the portable ice shacks and get out the boat. One way I scratch that itch is by doing a little preventative maintenance on my fishing rods, reels, and line. Nothing good can happen when your drag seizes up or your line breaks.
The following tips don’t take that long, are relatively inexpensive and can help ensure the upcoming season will give you stories have happy endings.
I start with the rods first, removing the reels and setting them off to the side for later. Materials needed are some finishing sandpaper (400 grit), some silicone spray, furniture polish, cotton swaps and three soft cloths. The first step is to use the finishing sandpaper to lightly sand off the grit and grime from the cork handles of your rods. These handles over the course of a fishing season build up dirt, algae, fish slime, skin oil, sunscreen, insect repellent, etc. The light sandpaper will take this outer layer of grime right off. Next, I use a wet cloth to wipe the handle clean, removing any cork dust and other residue. Just let the cork air-dry. These steps will not only make the handle look cleaner, but will also ensure a more reliable grip. And nothing good can come from a slippery rod handle.
For the rest of the rod, I wipe the rod and line guides clean with a wet rag and dry it with a cloth. Next, I’ll spray some furniture polish onto a soft cloth and wipe it onto the graphite or fiberglass rod blank. This process makes the rod look new again and also protects the rod from nicks, bumps and even UV rays. I finish up with the line guides. Spray silicone lubricant onto the tip of a cotton swab and use it to apply the silicone to the inserts of the line guides. The cotton swab is not only an applicator for the silicone, but doubles as a test of the integrity of the line’s guide inserts. If there are any nicks or cracks in the inserts, the swab will catch on them and let you know immediately that you have damage. Damaged inserts must be replaced, as fishing with nicks or cracks in the inserts of your line guides will damage your line quickly and lead to one of those heart-breaking stories of the big one that got away. These steps will make your fishing rods look and perform like new season after season.
Next, I move onto the reels and line. First, check the fishing line for signs of wear. Monofilament line stretches and is susceptible to UV damage from the sun. It also suffers abrasion from weeds, wood, rocks, fish teeth, etc., so you will want to check for nicks, rough spots and discolored areas that could indicate weakness from sun damage or the stretching of the line. If you find damage to the line, but most of it is at the business end of the line, you may be able to simply trim this part off if you have enough line left on your reel. Otherwise, you should replace the line. You want to make sure to keep the spool of your reel almost full. Not enough line on the reel shortens casting distance, but too much line on a reel leads to tangles. The final problem to check for with mono is line twist. Monofilament line develops memory on a reel, which can cause line twist and some serious difficulties while fishing, especially on a spinning reel. This will necessitate replacing your monofilament line fairly regularly, especially on spinning reels.
You can be among the first to get the latest info on where to go, what to use and how to use it!
Fluorocarbon line can suffer from some of the same ailments as monofilament, but it resists each of these problems better than mono so it usually lasts longer. You will still need to check your fluorocarbon each season and trim or replace any as necessary. Braided and fused filament lines hold up better than both mono and fluorocarbon, but you will still need to check them. While line twist and stretch won’t be a problem with these lines and abrasion will be much less of a problem, but a problem to check for are filaments separating or unraveling. Again, if problems are found mostly at the water-end of the line and you have enough line on the reel you may be able to just trim off the damaged part. If the damage persists too far up the line then it is time to replace it. Remember, the braided or fused “superlines” cost more than mono or fluorocarbon, but also tend to last longer.
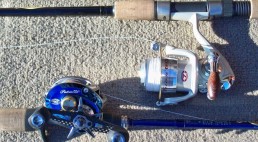
Once I’ve checked the line and trimmed or replaced it, I move onto the reels. For these, you will need some lubricating oil, two soft cloths and very small screwdriver. Many reel manufacturers make their own reel oils—some even include a small tube in the box with the reel. But a can of household “3:1” oil will work just fine. First, use a wet cloth to wipe the reel clean of algae, excess oil and the grime that can be stuck to the oil. Then, dry the reel with another cloth. Next, I lubricate the reel with the oil. For a baitcasting reel you will need to remove the side plate, which may or may not require a small screwdriver. Oil the gears inside the baitcaster as well as the line guide and the track that it moves on. Put some oil at the base of the handle grips, and then under the spool around the bearings.
Reassemble the reel and reel it for 30 seconds or so to work in the oil. Wipe off any excess oil and now you are ready to put the reel back on the rod. For spinning reels, remove the spool and the handle. Put some oil on the line guide, at the base of the handle grip and on the handle shaft. Finally, put some oil into the port (tiny hole) on the reel head near the spool shaft to get oil to the bearings. Reassemble the reel. Reel it for 30 seconds or so to work in the oil. Again, wipe off any excess oil dripping from the reel. You can now put the reel back on your newly cleaned rod and you are ready to go. These steps will make your reel look like new, but more importantly, will keep it working smoothly and reliably.
The old adage, “an ounce of prevention is worth a pound of cure,” holds true for many things. Taking care of your fishing equipment is no exception. Imagine a hunter just using his gun or bow year after year without ever cleaning or checking it. Your rods, reels and line are your most important tools as a fisherman, and you want them to be working flawlessly.
These tips above will extend the life of your fishing equipment. And let’s face it—rods and reels are getting more expensive each year. A few minutes of care for each of your rod and reel combos each spring is a small investment of time to preserve a big investment in prolonged use of your equipment. Preparing your rods and reels for the fishing season can also help treat, though not cure, a case of “spring fever.”

Did you enjoy this post?
You can be among the first to get the latest info on where to go, what to use and how to use it!