Time to Tune your Bow
The title of this article is a bit misleading, as it may imply that your bow is not in tune, or there’s just something else. We can talk about tightening up your shot groups too, which indicates your bow is in fact capable of shooting tight shot groups. But you need to realize that when you first purchased your bow it was probably set up by the shop where you purchased it. Since that time, things may have changed and your bow may be not shooting as well as it once did. You may have purchased a bow online, where it was never really prepped up for optimal “accurate” shooting in the first place.
You always want your bow to be in the best possible working motion as possible. If you do not work with an archery shop that can perform your setup for your bow, then it all falls on what and how you learn and the work you do yourself.
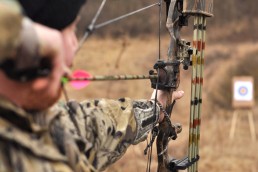
Tuning a compound bow and recurve bow are two different things. Most archers today are using a compound bow with a release aide. First, you want to make sure that your arrow is leaving the bowstring in as straight a line as possible. Arrows will oscillate to some degree when shot from a bow, and you want to get these oscillations as small or reduced as much as possible. The three main components to achieving this condition are, the arrow rest, the nocking point and your release.
Beginning with the nocking point, you must be sure the arrow is positioned correctly on the bowstring for a good arrow flight. Finding this point on your bowstring in not an exact science and you will have to find it for your refined bow and shooting style. A good deal has been written about the nocking point being “parallel to the arrow rest.” This may work for some shooters, but many archers will find the best place for the nocking point to be a little above parallel. Depending upon other factors such as shooting style and hold, a good starting point might be 1/8 inch above parallel.
For most archers, this will take a bit of shooting to find that perfect place for improved arrow flight. While doing this shooting you can work with the other components: arrow rest, shooting form and release. All of these have to work together in order to make an accurate-flying arrow. While you are doing your shooting in with these components, observe the position of your nocks in the target. You want them to be going straight into the target, and not pointing to either side. You may have to make some small adjustments of your arrow rest to achieve proper flight to the target. If the arrows are not hitting where you want them, move the component in the direction of the arrows. If an arrow is hitting to the left, move the rest to the left. This will hold true for your sight as well. Keep making small adjustments until you have the arrows flying out of your bow as straight as possible. Be constantly aware that a poor release can be a real culprit to tuning, so watch your shooting form closely.
You can be among the first to get the latest info on where to go, what to use and how to use it!
Once you have a correct arrow flight, try doing a paper test. Shooting through a piece of paper should result in a neat hole with small tears from the vanes. If you can achieve a clean paper test, you have things in very good order with this part of your setup.
Next, you will want to check your peep sight to make sure you are not moving your head at all upon full draw and anchor. It’s ideal to have a hunting friend help you with this. Also, draw back an arrow with your eyes closed; you should have to peep in the correct position when you open your eyes. If not, make the necessary adjustments. With that accomplished, you can now sight in your sight pins.
Starting with your first pin and shooting at 20 yards, get your pin dead on at this yardage. If you are not in the center of the target, make small adjustments until you can put an arrow dead center each time. Next, set your second pin for 30 and your third for 40 yards. Once you have your pins set for the various yardages you can do a little test to see if all is well with your setup. Put a piece of tape about 1 inch wide from the center of the target down about 2 feet. Then, go to 20 yards from your target and shoot one or two arrows. Move to 30, and still using your 20-yard pin, shoot one or two arrows. Next, move to 40 yards, and still using your 20-yard pin, shoot one or two arrows again. The second two groups will of course not be in the center of the target, but all the arrows should be in the tape.
If all is well, using the level on your bow, make sure each pin is the same distance out from the sight, and at the same distance. With that confirmed, you are now pretty well ready for quality, accurate shooting.
Finally, once you get your bow shooting down, during practice shooting you will not want to shoot all of your arrows at the same point on a target to save your nocks from being broken by incoming shots, or worse, a “robin hood,” which is one arrow going into another that is already in the target. It’s neat to look at, but expensive in the long run as one or both arrows have to be replaced.

Did you enjoy this post?
You can be among the first to get the latest info on where to go, what to use and how to use it!