Cutting up Your Own Deer Saves Money
SHARE THIS POST
Normally, I am not a person who is afraid to lay out a little bit of cash when I see something I really need, but at the same time I abhor spending money when it is not necessary. So, I began skinning, butchering and processing my own deer several years ago.
When I shot my very first deer decades ago, a skilled meat cutter processed it. He skinned, cut and froze it for $35—even then a little expensive. Presently, processors in northwestern Ohio are charging in the neighborhood of $100 and up. Too rich for my blood, especially when I may take two or more deer during one season. So, I got out the knives and began cutting up my own. It is not hard, but it does take some time.
Where to begin? Simple. Begin with some very sharp knives and either a hatchet or meat saw. Perhaps I’m oversimplifying, but I have watched videos and live presentations of the whole process, and there is no learning tool like your own hands-on experience.
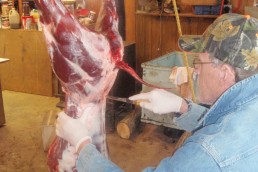
Let’s begin with the basics, the dead animal. My number one priority is to get the skin off without cutting into the meat. Deer hide is not difficult to remove. Hang the deer from a tree or from a gambrel in the garage, tool shed or barn. Make slits in the back legs below the knuckle and hang it with the head down. Just make sure it is a clean environment.
I usually start by skinning out the back legs, cutting carefully around the tail and the butt, and pulling and trimming the hide down to the head. My choice of knives for this work is a pair of very sharp filet knives. Once the hide is free in this area, I make slits in the fore legs, then grasp it firmly and peel it down to the hooves. If you have a friend who can help at this stage, then things go even quicker. The front legs are cut off above the tarsal gland, the hide is freed from the carcass and rolled into a garbage bag and placed in a refrigerator or a freezer for later. Then, with a hatchet or saw, the head is removed precisely where it joins the neck.
Next, any existing fat is trimmed from the carcass and placed in a bag and refrigerated, also for later. Inside the carcass, under the backbones are the “catfish tenderloins.” Don’t ask me why they are called this, but since they are the most tender meat on the deer, they should be trimmed out carefully and immediately cooled. Then, I trim off all of the external meat on the ribs and set it aside to be ground into burger or kept for summer sausage. Once that meat is gone, the backstraps are exposed and can be trimmed by inserting a finger in the crease at the edge of the straps, inserting a knife and cutting the top free. Then, carefully work the tube-like straps away by cutting from the backbone. On a clean table, cut them into medallions or small steaks.
The back legs are freed next. Unless I have helpers to do the cutting, I just remove one leg at a time and slice it into steaks, roasts or whatever cuts may be desired. There are charts galore in magazines and online that show how to slice top round, sirloin, etc. Many succulent cuts can be made from the abundance of meat on the back legs. As they are cut they are placed in separate piles and labeled before freezing.
Are you enjoying this post?
You can be among the first to get the latest info on where to go, what to use and how to use it!
After removing the back legs, a similar operation is performed with the front legs. While there is not as much meat here, I try not to waste any of it. One caveat: On any part of the legs, be sure to remove as much “blue skin” as possible, as this is what will give the deer a “gamy” flavor that many find objectionable.
Rib meat on a deer is used for burgers or sausage, and my friends and I take pains to remove even the scraps between each rib. Once completed you should have a sizeable pile of “scrap meat.” Set it aside for later.
Finally, the neck on a buck or a big doe can offer up some dandy roasts for future meals. Once you are finished, the carcass should resemble a skeleton that has been picked clean by scavengers.
Now that you have those mounds of meat on your table or workbench, the next step is to freeze it of course.
I used to wrap each package of meat in aluminum foil, and then carefully seal the package with masking tape. This worked okay, but it was very labor intensive. Then, several years ago, I purchased a vacuum sealer and everything changed for the better. By explicitly following the instructions, I now can seal and freeze deer meat in packages that will stay “good” in the freezer for extended periods. Of course, since I love to cook and eat wild game, it doesn’t last very long anyway.
The scrap meat, including the rib meat and the deer fat is placed into a grinder and ground into burger, later to be made into chili, spaghetti, browned and served with mushroom gravy and biscuits, or for whatever delectable dish I can think of. Or, some of it may be kept for sausage. Remember, any remaining “blue skin” will play havoc with the grinder blade—remove it!
No matter how you slice it (pun intended), deer meat tastes good. And by slicing my own, I save money for future hunting licenses.
MWO
SHARE THIS POST
Did you enjoy this post?
You can be among the first to get the latest info on where to go, what to use and how to use it!
John Bennett
John Bennett is a retired history teacher, historical re-enactor, father and grandfather. As a four-season outdoorsman, his passion is waterfowl hunting and fishing for smallmouth bass. He lives in Ohio and spends quite a bit of time in his primitive log cabin, which he built.


