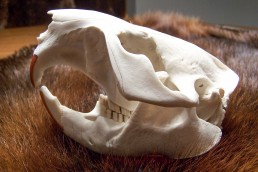
Creating your Own Beaver Skull Mount
During the void between deer and turkey seasons, the winter landscape has always drawn me outdoors to trap beaver through hard water in northern Michigan for about the last ten years. Although the deep snow, ice and sometimes frigid temperatures can pose challenges to the trapper, they are worth overcoming to put some fur in the shed and spend time outdoors. So, when I received an invite from my girlfriend’s son Zach to snare beaver, I gladly accepted. Within a few days, he successfully snared a large mature beaver weighing around 45 pounds. He decided to turn it over to a taxidermist for a full-body mount. Between two beaver carcasses from Zach and my nephew Brock—who had trapped one earlier in the season—I decided it was time to try my hand at making my own European skull mount.
Connect to the kill
Just like skinning and tanning your own fur-bearing animals, making a skull mount creates a connection with your time on the trap line and lasting memories from the field. It also creates a sense of satisfaction when you make one on your own. Although beaver blankets and mounts are a great way to display it in your home, they can be costly if you choose a taxidermist every time you trap one. Plus, a beaver skull takes up less space and can easily be placed on a shelf or table. Preserving the skull is a practical alternative that still allows you to enjoy the animal, but saves the time and money it would take to get it back from a taxidermist. You can make one in a couple of days with inexpensive materials that can be picked up at a nearby grocery store. This will allow you to save up for any needed trapping supplies or equipment that you need on your trap line.
Skinning
When a beaver is trapped, it is best to skin it right away. A beaver is skinned the easiest using the open pelt method. This requires placing it on its back with its belly-up on a stable work surface. Before removing the hide, you need to cut off the front and rear legs. This can be accomplished by making a small circular incision where the hair meets the legs. The legs will usually come off by twisting them numerous times or using a pair of meat scissors or hacksaw to remove them. Then, cut off the tail using a sharp knife and hacksaw once again.
With the beaver lying on its back, make a small incision at the base of the tail and cut all of the way to its chin. Next, begin carefully cutting and peeling the skin away from the muscle using a rounded-point skinning knife. Firmly hold the hide in one hand while cutting the hide down to one side of the belly and then repeat this step for the other side. Once you have cut both sides of the hide down, flip the beaver over on its belly and remove the hide from its back, cutting all of the way to the neck. As you reach the head of the beaver, cut around the eyes and ears and lastly the nose. This will remove the pelt. Lastly, remove the head using a hacksaw or small hatchet.
Skull preparation
Once the head is detached from the carcass, use a small filet or pocket knife to remove any excess meat along with the eyeballs and tongue. This will save you time before the meat dries out. Next, fill a crock pot with enough water to submerge the beaver skull along with some Oxy Clean for about four to five hours. Dish soap can also be used as a degreasing agent. Place the crock pot out in the garage or barn to avoid any fumes inside of your home.
So far, I have only used the crock pot method to prepare all three of the beaver skulls that I have finished. However, most people prefer boiling their skulls over a stove or burner to clean them. If you decide to choose this method, the water should actually simmer and not boil. If the water reaches a boil, it’s too hot and could cause damage to the skull. Because of the smaller size of a beaver skull compared to a deer, bear, or other big game animal, extra care should be taken because of how fragile they are. Because a crock pot cooks slower and is usually smaller, it is perfect for preparing beaver skull.
You can be among the first to get the latest info on where to go, what to use and how to use it!
Fishing out the meaty bits
After the skull has been submerged for four or five hours, the meat along with any cartilage and fat should easily fall off the bone. Remove the skull from the pot using a pair of tongs and place it on a cutting board. I find that a small pocket knife with a two-inch blade works best for cutting the meat. A small flathead screwdriver and needle-nose pliers can also be used to remove the brain and other hard-to-reach materials in the eye sockets and other crevasses. I also use a small wire brush to remove the finer pieces of meat.
Don’t be alarmed, but each time I have used a crock pot the jaw itself has split. However, the entire jaw does detach from the top portion of the skull, which I have found is normal and allows you to remove materials easier. No worries, this can be super glued back together after bleaching the skull with hydrogen peroxide. If you are having difficulties removing any stubborn pieces of meat or tissue from the skull, place the beaver back in the crock pot for another two hours or so to help loosen it up. This will allow you to scrape the remaining pieces from the skull. Once your skull is completely free of any type of debris, gently scrub the skull with dish detergent and then rinse.
Whitening
At this point in the European mount process, your beaver skull needs to be whitened in order for your skull to reach its full-potential. Your skull will continue to appear a light yellow color and very unattractive if left alone. I have found that the best way to whiten beaver skulls is by using hydrogen peroxide. This can be purchased at a local grocery store for a very cheap price. Although the store-bought solution is very weak, I have had great results using the three-percent hydrogen peroxide in 32-ounce bottles.
After I carefully place the beaver skull in the bottom of the crock pot, I add enough hydrogen peroxide so that the skull is completely submerged in it. After returning in two hours, your beaver skull will be a brilliant white and free of the yellowish color.
Gluing
After removing the skull from the hydrogen peroxide, you will need to let the skull dry off overnight. Once the skull is completely dry, you can then super glue the jaw pieces back together and then glue the top piece of the skull to the jaw bone. On each of the three skulls that I completed, I placed a small amount of gorilla brand super glue to the bottom teeth and the back of the jaw hinge/joint. This type of super glue is extremely strong and held all of the pieces together with no issues.
Display
A skull mount of a beaver didn’t even cross my mind a year ago until I realized the raw beauty and uniqueness of them. Beaver blankets and full-mounts always catch my eye while entering a sporting goods store or someone else’s home or deer camp. A beaver skull seems to have a way of standing out on its own. Having the ability to make one gives you a sense of satisfaction and allows you to recall your time on the trap line creating memories that will last a lifetime.
Did you enjoy this post?
You can be among the first to get the latest info on where to go, what to use and how to use it!