Tip-Up Technicalities
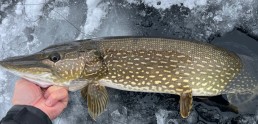
Just as we were remarking that the devices could be called “stay-downs,” the first tip-up flag of the day flew, and we managed to put a decent pike on the ice. The method, though effective, offers lots of opportunity for analysis, so let me share some considerations that may help fellow pike fans see more flags tipping up this winter.
Getting edgy
Location—the most important fishing and hunting component—is even more important when ice fishing. You have just pinholes to find fish and get them to strike, and even using 50 to 100 pinholes in a long day on the ice, you are not presenting baits to as much territory as a single, careful, trolling or drifting pass over that same area on open water. Your baits will be shown much longer in the pinholes you choose, but if the fish aren’t there, or are nearby and stationary, you are in for a long day compared to all the water you can present baits to the rest of the year.
So, it’s especially important in the hard-water season to pick waters with good populations of pike. You can’t cover much water to search them out, so it’s not the best time to explore for new waters, except for some that may allow for winter access that you can’t get on the rest of the year. But it’s still better to not try new lakes haphazardly. Use some credible basis, such as your state’s fisheries survey reports, indicating that their pike populations are healthy in numbers at a minimum, and maybe even have some good- sized fish.
Let’s review the “where-to” aspect on a given pike lake. Very consistently, the best edges possible are your top bets for winter pike. Sure, they may well wander shallow or mid-depth flats, or even open water sometimes, depending on forage; but pike are typically very scattered and tough to connect with if fish are not moving much on a given day—or even if they are and the less-defined areas they are using are large. Instead, well-defined drop-offs, which usually coincide with a remnant winter weed edge on most lakes, hold both stationary fish and be used more consistently when fish are moving.
There can be a lot of drop-off edges on many lakes, so narrow it down to the best available. That’s usually, but not always, an edge against a broader shallow or mid-depth area which tends to hold more forage. Steep drop-offs close to shore can work, too, but are usually secondary to the drop-offs adjacent to more reliable broad, shallower areas. Modern ice fishing electronics help you find the best places, including remnant weeds. Marking prime spots with a handheld GPS or cell phone app before winter is extra helpful.
“Even better” edges have significant irregularities along that defined, weedy drop-off; the very best are often pronounced, inside turns along the contour. Points, which, by definition, have at least somewhat of an inside turn on both sides, are good, too. But placing tip-ups along the narrowest and most defined inside turns, vs. more gradual versions, is almost always money.
Tip-up set-up
Once on a chosen area, it’s a matter of determining specific spots for your tip-ups. More thorough coverage tends to be better than tip-ups placed great distances apart, despite the notion that far apart covers more water. With such wide spreads, in addition to more work and time getting around tending them, you stand a good chance of missing prime, exact spots. It’s better to work a really good area with more holes and tip-ups rotating around them; the “far apart” strategy can easily have you in the neighborhood of willing pike but not close enough to get bit, especially if it’s a day when they aren’t moving much.
Also, the more holes fished, the better, such as a minimum of three holes per setup, though five or more are better. They can be staggered roughly shallow on the edge, mid-way down, and deep. So, if you’re fishing solo that day, rotate each of your tip-ups around nearby holes until something happens. This tries to pepper that edge pretty thoroughly by ice-fishing standards, with the tip-ups placed not that far apart. For example, if using three tip-ups around a small point, it’d be placing one on the best inside turn, one on the other turn, and one at the end of the point.
As for depths of the baits—usually shiners, suckers or possibly dead baits like smelt if you can get them—it’s generally best to err upward in the presentation. This often means suspending baits around halfway down in waters of 10 feet deep or less, depending on remaining vegetation; somewhat closer to the bottom in the mid-depths, say 10 to 12 feet down over 15 feet of water; then within a few feet of bottom in waters more than 15 feet deep. The eye position of pike naturally looks upward, and placing baits too close to the bottom can lose your bait in whatever dormant vegetation is there. Instead, placing it just above the weeds, with your minnow perhaps trying to swim down into them, can inspire some motion with a live bait.
Live baits still tend to tire, though, so it helps to stroll by and lift them occasionally, both to confirm that they didn’t get any weedy junk on them if positioned too deep, and to get the bait moving a bit again. Plus, this can occasionally trigger a pike not far away that was watching but didn’t commit before then.
One extra tip on depth placement: If the drop is extremely steep and adjacent to a flat area, you can set the tip-up shallow over deep water, but still very close to the edge. That way, a fish near the shallow flat edge, partway down it, or even quite deep, may notice the bait if the water is clear, which most waters are in winter.
You can be among the first to get the latest info on where to go, what to use and how to use it!
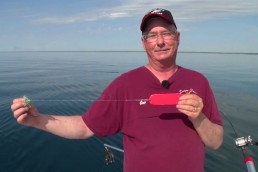
Most of us use iterations of the basic “Polar” style tip-up to keep the line submerged and indicate a running fish by the spindle turning. This and the “windlass” style can be a plus on a warm enough day that the line isn’t freezing onto itself, since it’s out of the water by design. With both types, you can use black rubber mats to slow the freezing of the hole, and not send that unnatural dome of light downward over the bait. Some models are built on their own hole cover, so you don’t need the mats.
It can’t be proven that daylight streaming down the hole makes a difference, but the “windlass” style seems to produce quite often, when conditions permit. It needs to be warm enough—close to or above freezing—say the upper 20s or more out. If it’s dead calm, that’s not helping, because the windlass will not move up and down to activate the bait. And if it’s extremely windy, that can be a pain, too. On modestly windy days, you can set up windlass tip-ups facing downwind or upwind, bending the paddle a bit if it helps to get some but not too much movement—ideally just enough to prevent the minnow from sitting there motionless.
As for rigging tips on baits, hooks, lines and weights, you’re usually using only smallish baits by pike standards, like shiners and suckers from 4 to maybe 7 inches. So, it’s a single, small treble like a #8 or #10 pinned just past the dorsal fin, with long, light and flexible wire leaders such as 20-pound Surflon Micro-Supreme. Fluorocarbon works, too. A “hard leader” version like Seaguar’s Blue Label is much tougher than regular fluorocarbon and nearly invisible, even in 15- to 25-pound versions.
You can also snip the tail area of a live minnow a bit to make the bait more appealing, including a more vulnerable swimming action and enhancing its scent trail. Above the leader, placing a lightweight, cone-shaped, slip sinker, rigged in reverse, helps; it either slides through old weeds when a running pike takes, and if it hangs up, a pike can still pull out line.

Smooth moves on hard water
With multiple holes to work per tip-up, it’s better to not wait too long before you move sets to hopefully contact pike. If 15 to 30 minutes goes by without a response, the tip-up usually goes to its next stop. If there’s snow and it’s not too windy to blow it away fast, you can mark the depths of each hole and checkmark them off as they go through their placement progression. If a hole gets a confirmed flag, it gets another checkmark to denote the success. Leave it there longer, usually much longer, until it seems that nothing else is happening soon. It never leaves if it continues to produce. And if the action slows, you can move it, but still bounce back to the spot again, especially if other holes don’t get some action.
The objective on solo days is that each of your tip-ups ends up getting in a proven hole, and it often takes a while to arrive at that. Then just enjoy it, not worrying, if you get to all the holes you intended to fish. With partners, it’s the same approach per angler; ideally 6, 9, 12 holes have all been hit, though it usually takes plenty of holes and tip-up moves to get to that point.
This thorough method really only allows you to fish one prime area if you have just a half day or so to fish. And say one big move if you have all day; even then, it’s usually a “leap-frog,” tip-up by tip-up shift, to an adjacent good area, not packing it all in for a long haul somewhere else. On tough days that force a complete location change, it still pays to keep baits in the water, presenting as much of the time as possible, which is why trolling is so effective on many open-water days.
Hopefully, this detailed discussion from a picky pike fan helps you get some tip-up flags up and flying this winter. If you’d like a comprehensive guide to year-round pike fishing in the Midwest, please check out your humble author’s book Diary of a Mad Pike Fan available on Amazon and other online sources.
Did you enjoy this post?
You can be among the first to get the latest info on where to go, what to use and how to use it!