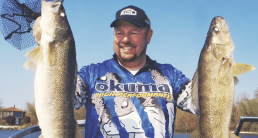
Spring Walleyes: Trolling for the Golden Fighters
Walleyes and spring have always been synonymous. It just seems that the change in the season from the bitter cold to the warmer days triggers me to chase these yellow, toothy devils of the deep.The typical haunts of these fish can vary from one body of water to another. However, in the spring, they have one thing on their minds: the spawn.
This will typically happen on shallow rocky reefs or in the shallower waters of bays. The key is to know where these fish are spawning and how to intercept them coming from their spawning grounds. Personally, I prefer to catch these post-spawn, and the areas I’m fishing rely on a quality spawn cycle in order for walleye populations to keep on with self-sustaining growth. There are great ways to catch these up on the reefs by jigging live bait, but my preferred method is trolling the proverbial “fish highways” and intercepting them as they leave the spawning grounds. You can catch these fish during the spawn. However, my main concentration is after this event.
Trolling is not everyone’s cup of tea. However, it is probably one of the most effective methods for catching post-spawn walleyes on some larger waters. Your odds of intersecting these fish increase dramatically by trolling, for this puts you and your baits constantly on the move.
Fishing in March has many variables that can mean success or failure. Water temperature and water clarity are right up there as the top two that will influence your catch rate. Typically, water temperatures will greatly affect your choice of baits for the early-spring walleyes. I like to use the 50-degree mark as a transition point. Anything under that usually means crankbaits will be the best choice, while anything over will make it time to pull out the ‘crawler harnesses. And, often, trolling with both presentations will put fish in the boat.
There’s a huge selection of crankbaits on the market, but my favorites are Reef Runner 800 and 700 Series as well as Bagley’s Walleye Deep Diving Shads and Smithwick’s Perfect 10s. Crankbaits have a natural diving curve, however these don’t always get down to the fish on their own. Employ inline or snap weights to get them in front of the fish. In my opinion, this is more important than the actual bait movement or colors.
In the spring I tend to lean more toward the snap-weight approach. But stealth is the key for these wary fish, and getting that weight farther away from a bait can mean more bites than when just using an inline weight a few feet or less from a bait. Snap weights are a method of utilizing a clip that has a weight attached to it of a chosen size. This clip is then clipped to the line and will take the bait down to the desired depth. The typical method would be to let out between 20 and 50 feet of line then clip the weight onto that line. Then, weight is let out to a particular distance in order to get the bait down to the desired depth.
You can be among the first to get the latest info on where to go, what to use and how to use it!
If you find that you’re on a “meat” bite then it’s time to break out that ’crawler harness and box of spinner blades. The ’crawler harness is nothing new to fishing and everyone has a preference how they are tied. Some people prefer store-bought harnesses while some guys, like myself, prefer to tie our own. These are pretty basic and consist of a couple of hooks tied with snell knots and then a series of beads and a clevis to hold a spinner blade. Utilizing a quick-change clevis allows me to change blades to find out if a particular color or size is needed to produce fish.
For spinner rigs basics, we have a nightcrawler, a few colorful beads and a spinner as an attractor. These rigs are fished very similar to a crankbait. Snap weights or even colorful fish-shaped inline weights are then used to get them to the depths fish may be suspending at. Heavier “bottom-bouncer” weights are used to get spinner rigs right on the bottom to inactive fish.
I’ve made several references to the use of inline and snap weights, however, I’ve neglected to mention the use of leadcore. This is another great stealthy option and really makes a difference on days you can’t seem to get the fish to bite. The slow undulations of the leadcore line can make the fish unable to resist the bait.
When trolling in the early spring I like to use the Church Tackle side planar boards to spread out my baits to cover more water. This also allows me to use more of that stealth approach. The farther the baits are from the noise of the boat’s motor or its shadow, the more you increase your odds of a catch. You can also utilize a stern planar to get the baits far from any noise, yet keep a direct connection to your bait by watching the rod tip.
Speed can play a key role during the spring bite. Often, we find that running 1.1 to 1.3 mph produces the most action, however it’s important to pay attention to what is going on when you do get bit. If you are hit on an outside board while making a turn that could mean that you need to speed up a little. Conversely, getting hit on an inside board could mean you need to slow down. Don’t be afraid to vary your speed somewhat or experiment. There have been times when a pause in the boat’s movement has caused the fish to attack a bait after the boat picks up speed again. This action you impart with your boat makes the bait slow down then suddenly take off, and fish just can’t seem to resist this.
Spring walleye trolling can be an exciting way to put some great-tasting fish in the livewell, or even a trophy. Take your time and fine-tune your presentation and you are sure to land yourself one.

Did you enjoy this post?
You can be among the first to get the latest info on where to go, what to use and how to use it!