Positioning Secrets for ‘Crawler Harness Mastery
At one point in my life I thought about pursuing pro walleye fishing. As a step on this discernment, I fished as an amateur in the former Professional Walleye Trail (PWT). Eventually, I teamed up with a group of pro anglers to help them with prefishing and had the chance to fish walleye waters all over the U.S.
One of the key takeaways from this experience that really helped me to become a more effective walleye angler was the fact that ’crawler harnesses are ideal to use in a variety of waters and depths and are absolute ’eye-catching machines.
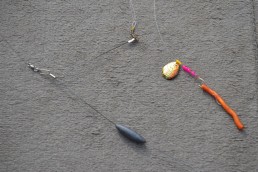
The bottom bouncer
There a number of ways to get your ’crawler harness down into the fish-catching zone. About 90 percent of my ’crawler-harness fishing is done with a 2-ounce bottom bouncer. This can be pulled in 5 feet of water or as deep as 30 feet effectively. This versatility allows you to work up and down drop-offs, on the edges of reefs or along a weedline while maintaining contact with the bottom.
The 2-ounce bouncer also works well when pulled over rocks and rubble.
Much of my fishing is on Lake of the Woods, in famous reefs like Starren, Knight and Bridges, Arnesen’s or Archie’s, or up at the Northwest Angle where the 14,552 islands of the lake begin. This is where a bouncer can ride just above the rocks, avoiding snags. I let my rod tip back periodically to feel the bouncer touch the bottom. By touching the floor periodically, I know exactly where my bouncer is at, yet I don’t drag the bottom, which avoids snags.
Bouncers are even effective in sparse weeds where many walleyes hide out a good portion of the year. The bouncer will ride through and over weeds, which also can be an attractant for the spinner and ’crawler following close behind.
Rarely I will go to a heavier bouncer. For instance, out in the 32-foot basin on Lake of the Woods, I’ll go to a 3-ounce bouncer to maintain more of a 45-degree angle, which then provides me with more control while still maintaining my desired speed of 1.25 mph.
The harness
There are a lot of great harnesses on the market, but for most situations I purchase a variety of two-hook harnesses. I also tie my own because you can’t always trust an individual who is tying the harness when fishing a tournament or if you’re with a group. Second, I can tie my own bead patterns, choose my own line, length of harness, etc. With that being said, most don’t fish tournaments and the majority of harnesses you can purchase have quick-change clevises for the blade, have fluorocarbon line and effective bead patterns matched with a blade.
Most of my harnesses are 4 to 6 feet long. And with the properties of fluorocarbon, I can get away with 15- to 17-pound-test line. Not only do I have the advantage of stronger line for the fish’s teeth when pulling through rocks and wood, but it also keeps the harness running straighter with less tendency of getting tangling up. The line is virtually invisible in water, so a thicker diameter doesn’t seem to matter. It’s also a benefit when the fish shakes its head in the net and the line doesn’t break.
I like number 2 or number 4 octopus-style hooks. I normally tie the hooks, about 1 1/2 to 2 inches apart. This allows for one hook in the head of the ’crawler and the other to be near the band of it. Ideally, I want the ’crawler running straight in the water. If you have interest in tying your own harnesses, I recommend looking at YouTube, as there are many examples.
You can be among the first to get the latest info on where to go, what to use and how to use it!
Match the bait with beads, quick-change clevises and blades
I like to tie harnesses with a variety of bead sizes and colors. If you’re fishing with a partner, start out with different bead color patterns and spinners and begin to hone in on what the fish want that day. It’s also not a bad idea to “match the hatch” if you know what the walleyes are feeding on.
By tying or purchasing your harnesses with a quick-change clevis, again, you have the ability to easily change the size, style and colors of the blade. My tendency is to use a smaller blade in the early season or in very clear water. As the water temperatures increase, like now, I will increase my blade size. And when I say a small blade, I mean a number 2 Colorado style, and when I say big, I mean a number 6 Colorado. The blade size I use most often is a number 4 Colorado. Then the go-to color for me on Lake of the Woods and many other waters is hammered gold, with pink being my second choice.
Speed and angle
The go-to speed for pulling a harness is 1.25 mph. I’ll range from 1 to 1.6 mph, but most of the time 1.25 mph is the key. I really focus on having about a 45-degree angle of my line from the end of my rod to the water. A 45-degree angle allows me maximum control to feel the bottom. The opportunity to periodically drop my rod tip back to touch the bottom with the bouncer, yet not drag the bouncer on the bottom, is important. I prefer having the bouncer ride just above the bottom, even if the fish are tight to the bottom. The 45-degree angle also allows me to avoid snags verses pulling the harness farther behind the boat at a flatter angle.
Rod and reels
Although any rod and reel will work to pull a harness, the ideal setup is with a medium-action baitcasting presentation with a flipping switch. The flipping switch allows you to open the spool to let out more line as you drift or troll into deeper water to maintain contact with the bottom so you don’t have to turn the reel handle to engage the spool. By flipping the switch, the spool automatically engages, which makes life a bit easier. A spinning rod and reel will certainly work. But whichever way you go, make sure you let the bouncer and harness down slowly and don’t let it free fall, as it will tangle.
The storage system
The easiest system I’ve found to store harnesses is by wrapping them around swimming noodles. You can pick these up in the toy department for a couple of bucks. Find a sealed container used for storage as well that will fit the desired number of noodles and the storage compartment of your boat. Then cut the noodles in lengths to fit the container. I suggest taking a fillet knife and making 1/2-inch grooves around the noodle every inch or so. This allows the harness to stay secure while on the noodle.
Hooking more fish
I’ve learned a few things that help my hook-set percentages. When a walleye bites a harness, it normally isn’t a violent strike, but more of a feel of a “swimming weight.” Slowly drop the rod back without giving any slack, and after about two or three seconds sweep the rod forward for a hook-set. The other option is leave your rod secured in the rod holder. The rod will “load up” and the fish will often seem to hook itself. I know some tournament anglers who will not tell their amateur partner when a walleye is biting until the fish is actually hooked.
When a walleye whacks your harness but doesn’t stay engaged, try dropping your rod tip back and let the harness sit idle for a couple of seconds. Often, this hesitation will cause the trailing walleye to eat.
Live ’crawler or artificial ’crawler?
It’s only my opinion, but live ’crawlers are the best. I like to pinch off the nightcrawler with only a few inches of it hanging behind the back hook. My reasoning is that with a 2- to 3-inch tail, the ’crawler still has incredible action. And when the walleye hits my presentation with less ’crawler off of the back hook, my hooking percentage goes up as the back hook will end up in the walleye’s mouth more often. Experiment on the boat, but normally a whole ’crawler is not needed.
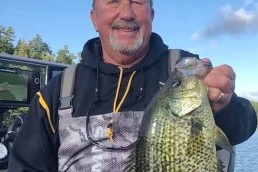
Regarding artificial ’crawlers, I’ve tried numerous brands, but the time I really prefer an artificial is when there is an abundance of panfish that quickly eat my bait. I prefer to have more “hook time” over being out of the water, rebaiting often.
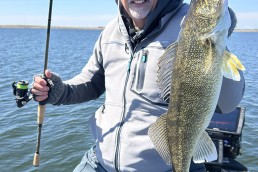
Whether you fish “The Walleye Capital of the World” or another body of water, learn how to pull a ’crawler harness for walleye success. If you don’t currently use ’crawler harnesses, break out of your comfort zone and try them. Adding these harnesses to your walleye tool belt this summer will improve your walleye catch rate.

Did you enjoy this post?
You can be among the first to get the latest info on where to go, what to use and how to use it!