Order Up! Walleye in the Salad
If you are going fishing with your buddies, there is no doubt that there will be a little bit of “ribbing” going on throughout the day. Every move you make is fair game. If you trip and break a rod, drop your sunglasses in the lake, or reel in a ball of weeds, you will most likely get a little grief. While we really can’t help you when it comes to being clumsy, we can help you bring back more walleyes than weeds to the boat.
To a lot of fishermen, the thought of casting a crankbait with weed grabbing treble hooks toward vegetation sounds like a hassle. Yet with the right approach, it is actually a fun and easy way to catch early summer walleyes.
The first key to success is doing a little bit of homework to find the weed edges. This will allow you to keep your distance so you don’t spook the fish and keep your lure in the strike zone without bringing back a ball of salad with every cast.
If it is our first time on this body of water, we start out by making “S” curves back and forth over the weed bed to find the edge of it. Every time we find the edge, we place an icon on our GPS. This will give us a trail to follow. If we find another piece of structure just outside of the weed bed, such as a rock pile or stumps, we will mark them with a different icon so we can pull our crank past those too on the retrieve.
If we will be fishing the area often, we will drive over targeted areas in a grid-like pattern to record our sonar logs to an SD card on the GPS. Upon returning home we upload the data from the SD card to the Lowrance Insight Genesis program, which creates a custom map. This map is then saved back to the SD card to be used on future fishing trips.
The cool thing about the map is that it allows us to identify small points and holes that we otherwise would not know about.
You can be among the first to get the latest info on where to go, what to use and how to use it!
We can also add a vegetation layer to our map, which is a great way to “eyeball” where weed beds are, so we can find the edges. In addition, it gives us the ability to pinpoint key areas of structure with a color-coded composition map. The darker areas indicate a hard bottom, while lighter colors indicate a soft bottom.
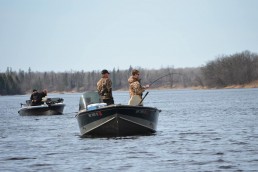
Once we know where the weed line is, we position the boat so we can cast at an angle towards them. When we get into an area where we get a bump or catch a fish, we stop and thoroughly fish that area. This is where we use the “anchor” feature on our MotorGuide Xi5 bow mount trolling motor to hold us in place while we “fan-cast” over the area. This is also a great way to pick apart a piece of structure in the area.
We won’t lie, there are going to be times that you will get your lure stuck on the weeds. A little trick for getting your lure unstuck if you make contact with them is what we like to call the “double pop”. Many times when you first make contact with a weed and try to “pop” it off with a quick jerk up, it won’t pull through. Instead, try giving it a pop, then drop your rod down to give it some slack. This will leave some space between the lure and the weed. Follow this with another quick pop and it should pull free on the second pop.
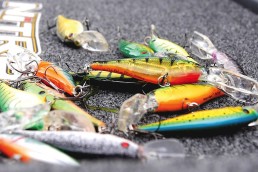
Our favorite lure for this technique is the Berkley Flicker Shad. A lot of times when we are casting shallow we like to use the #6 Flicker Shad, but when casting to weed beds that are up to nine feet deep, we go to a #7 Flicker Shad because it has a deeper dive curve. Perch and fire tiger are good choices for color, but don’t be afraid to mix it up and give the fish something different to look at.
We can’t guarantee that following this program will keep your buddies from toning down on the amount of grief they give you in the boat, but we’re confident it will get you the next bite.


Did you enjoy this post?
You can be among the first to get the latest info on where to go, what to use and how to use it!