Make this Proven Smallmouth-killer at Home
SHARE THIS POST
There was a time when I thought a minnow was better than a hair jig for smallmouths. While I have shied away from live baits in my smallmouth angling and have seen many types come and go I still carry a supply of bucktail jigs and 4-inch worms in my box. And this is what started me molding and tying my own smallmouth jigs, which I still do.
Here’s how to make your own supply:
To start, get some jig heads. I fish a lot of rivers and I like 1/8 and 1/16 ounce. You can them painted or buy commercial vinyl jig paint if you want to do it yourself. Or, just go with a plain lead head. Cost and how long you think they will be on your line can affect your choice, and rivers have a tendency to eat jigs on a regular basis. You’ll also need a bucktail or deer hair to work with. Other equipment needed is a vise, a threader, a bobbin to hold the thread, scissors and thread. I use super glue as cement because it dries fast. If you want to mold your own jigs you can invest in molds, hot pots, hooks and other items. By now, most of my stuff has paid for itself over and over.
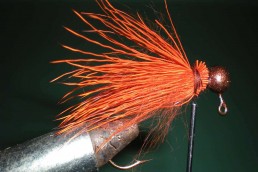
First, put the jig head in the vise hook down. Then, put a small dab of super glue on the collar and secure the thread, which by now should be in the bobbin and pulled through by the threader. Just a few wraps will hold it. Next, trim a piece of bucktail and hold it tight. Once cut, it will become individual hairs. Lay it on the collar, and using the bobbin, wrap the thread around this to hold it tight. You can fan it out as you lay it in place so it covers the sides and not just the top of the collar. Put a dab of super glue on it. Next, once it’s secure, the weight of the bobbin can hold the bucktail on the jig. Take the jig from the vise and turn it over so the hook is facing up. After this, cut another piece of bucktail and lay it on the bottom of the collar, which is now facing up. Then tighten it down with the thread and put a little pressure on it to flare out the bucktail. Wrap until you have thread that goes 1/4 inch from the actual round head of the jig back along the collar. Once tight, use another drop of super glue to secure it and wrap the thread around a time or two in sort of a half hitch. Snip the end of the thread, and when dry, you have a finished jig.
Are you enjoying this post?
You can be among the first to get the latest info on where to go, what to use and how to use it!
Supplies can be purchased through one of the do-it-yourself catalogs, like Lure Parts Online or Barlow’s Tackle. You may find these online or advertised in the magazine. After doing this for a number of years, I use a lot of regular sewing thread to tie my jigs. The problem here is sewing thread is easier to break, especially when you are learning. You should be able to buy regular tying thread, which is stronger, through these catalogs. You can find a fairly wide color spectrum of bucktails there too. I generally use the natural color of bucktail, brown and white. I also use various other shades of brown, olive, chartreuse and orange to provide some variance, since most of the time you are trying to imitate the crawfish colors.
When tipping the jigs with a 4-inch worm I’ll usually bite off the front inch or so. The added tail color helps get a fish’s attention. It also doesn’t hurt to spray them with a fish attractant if the bites are slower especially since deer hair holds scent pretty well.
It won’t cost very much to put together a dozen or more when you do it yourself. And, it makes it a lot easier when you have to break baits off on snags. And as an added bonus, it’s always cool to catch a bunch of fish on baits you made yourself.
MWO
SHARE THIS POST
Did you enjoy this post?
You can be among the first to get the latest info on where to go, what to use and how to use it!
Tom Luba
Tom Luba is a freelance outdoor writer living in New London, Wis. He has written about open water fishing for more than 35 years.


