DIY European Deer Skull Mount
Deer season was a success, and you have another great buck to go with the other four already on the wall. The buck is a good one, but no better than any of your other mounts. So, the question arises: “Do I fork over the $450 to have this nice 8-pointer mounted?
There is an alternative: European deer mount. You can send your skull off to a taxidermist if you want, but that will be a hundred-dollar bill. So why not do your own? It’s easy, and the results will be just as good as a taxidermist. Here are the steps to creating a great-looking mount that allows you to proudly display your buck with the others.
The first thing is to remove the skull from the neck with a hacksaw. You can leave the hide on the skull if you like, but removing it will speed up the boiling process. Removing the hide from the skull is recommended and is not that difficult. Once the skull is ready, you need a pot large enough to completely submerge the skull. Don’t submerge the antler bases or they will discolor. If this happens, you can color the antler bases with wood stain to match.
Boiling deer skull in Borax
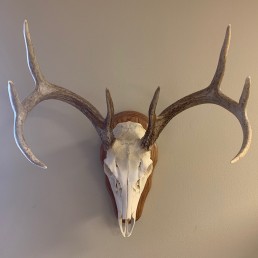
It is recommended that this part of the process be done outside. You need a burner to heat the pot of water to boil the skull. A turkey fryer is perfect if you have one, or a propane burner on your grill. I used my camp stove to produce the mount in the photo and a large, heavy-duty pot that I got at a second-hand store.
Once you have the pot ready and the water warm, add some Borax and stir. You can do this with just water, but boiling your deer skull with Borax helps degrease and shrink the meat in hard-to-reach cavities like the nasal passages and brain cavity.
This process can take several hours. Check the skull regularly and add water as needed. Use a knife to scrape the meat from the skull. Don’t get too aggressive; just remove what comes off easily then boil it a little more. Be sure to add a little water that was lost in the process, and you can add a little more Borax at this time as well.
Use a water hose to clean out the nasal cavities and all the little pockets. The pressure from the water hose makes this process easier and quicker. Now, remove the brain from the brain cavity. The Borax shrinks the brain and makes it easier to remove it from the small hole in the back of the skull. A metal coat hanger is a great tool for this step.
Return the skull to the boiling water for a couple more hours. By now, the lower jaws may have come loose. Just put them in the boiling water along with any teeth that might have fallen out during the process.
Remove the meat
Now the skull is almost finished. Remove it from the boiling water one last time and inspect closely for any remaining meat. Clean the skull thoroughly. If there is any meat still attached to the skull, just boil a little longer.
You can be among the first to get the latest info on where to go, what to use and how to use it!
Once the skull is completely free of meat and cartilage and the brain cavity is clean, glue the teeth and lower jaw in place. I have yet to lose any teeth, but I know people that have, so just be sure to glue the teeth in place before gluing the lower jaw. Trial fit the lower jaw, then add a small amount of super glue at the contact points and hold in place until dry. Repeat for the other jaw and set aside for a while before handling to allow the glue to completely set up.
Whitening the skull
There’s one more step you might want to do: bleach the skull. The skull pictured in this article was not bleached. Bleaching the skull is a simple task, but one of personal preference. The Borax process seems to bleach the skull nicely, so I skip this step. But if you prefer a little whiter skull, use peroxide. The peroxide most of us keep around the house isn’t strong enough. You’ll need at least 40 percent by volume. You can buy this at hair salons.
Pour the peroxide into a container and use a small paint brush to paint the skull thoroughly with the peroxide. Be sure to wear gloves and eye protection, just to be safe. Make sure to get the peroxide in every nook and cranny so that the whitening is uniform throughout the skull. For problem areas that just will not whiten, use a paper towel to lay peroxide on the problem area and saturate it. Let it stand for several minutes and check. Continue this process until the skull is whitened throughout.
How to seal your mount
Another step that I skip, but is very popular, is painting the skull with Elmer’s glue. This process gives the skull a bit of a satin finish and helps seal and strengthen the skull. Use regular Elmer’s glue, but add about 50 percent water to thin it. Paint the glue on evenly, getting into all the cavities again so it looks uniform. The glue also helps hold the teeth in and will fill any cracks in the bone, which makes it much easier to dust.
Hanging your mount
To display your skull, either purchase a nice plaque for around $40 or just hang it on a hook on the wall. Or if you’re handy with a saw and some wood, make your own.
A European mount is a great way to preserve memories of the hunt and save some money. It’s also a great reason to get out of the house and create something you can be proud of that will last forever on your wall.
For more insight and tips on how to make the most of your hunting harvest, check out the articles in MidWest Outdoors, available by subscribing on our website.
MWO
SHARE THIS POST
Did you enjoy this post?
You can be among the first to get the latest info on where to go, what to use and how to use it!