
Lure-Line Connection Can Determine a Good or Bad Day
It’s hard to imagine, but something as simple as how a lure is connected to the fishing line matters. In fact, how a lure is attached to the line can make the difference between a good day, or an absolutely outstanding day, on the water.
In some cases, using the right type of terminal connection plays to lure action. In others, it’s about creating an ultra-finesse connection to hide the line from finicky fish. In still others, the connection type selected can save hours of frustration with issues like line twist. Knowing the absolutely best way to connect fishing line to fishing lures may not be a glamorous skill, but it’s an important skill that every avid angler should master.
 Jigs
Jigs
Jigs used for casting, vertical jigging, swimbaits, dragging or slow trolling should all be tied directly to the terminal end of the main line using simple improved clinch knot or the iconic Trilene knot. This style of termination is stealthy and connects the lure to the line with the least amount of fanfare.
When jigging with monofilament, co-polymer lines or fluorocarbon line, simply tie the jig on and go fishing. If you’re using superlines for jig fishing, it’s important to first tie on a short (24- to 36-inch) leader of fluorocarbon line using a double uni-knot to secure the superline to the fluorocarbon leader. In this case, using a fluorocarbon leader that is the same break strength as the main line, or one size heavier, is typically the best option. When fishing in very clear water, it may be necessary to make the fluorocarbon shock leader a little longer, and also thinner in diameter than the main line.
When targeting toothy critters such as northern pike or muskies, the fluorocarbon shock leader may often need to be much larger in diameter than the main line to prevent annoying “bite-offs” from the sharp teeth of these predators.
If superlines are used with a fluorocarbon shock leader, the knot used to tie the leader to the jig must be weaker than the knot used to attach the superline to the fluorocarbon leader. This is why the Tribune or improved clinch knot is so important. If the jig is snagged, these knots will fail before the double uni-knot used to attach the shock leader.
So, the ability to break off the jig and retie another one without having to also tie on a new shock leader is an all-important skill set.
In-line spinners
In-line spinners like the iconic Yakima Bait Rooster Tail are one of those lures that routinely creates line twist issues. One way to eliminate line twist when trolling or casting in-line spinners is to tie a good quality, ball-bearing snap swivel to the main line, and then attaching the spinner to the snap swivel. For most applications, this termination system works well; but there are times when a stealthier approach is called for.
When casting spinners into ultra-clear water, such as often happens when trout fishing, it’s better to rig up an in-line swivel tied a couple feet ahead of the spinner. In this case, tie a small barrel swivel to the terminal end of the main line, then tie in 18 to 24 inches of fluorocarbon leader, and tie the leader directly to the spinner.
This setup eliminates line twist and creates an ultra-stealthy presentation for the spinner.
When fishing in-line spinners, avoid crane swivels and other brass swivels that simply can’t keep up with line twist. Premium-quality, ball-bearing swivels are expensive, but they are absolutely necessary when fishing with anything that has the potential to twist the line.
‘Crawler harnesses
Nightcrawler harnesses are another common fishing presentation that can twist a fishing line into knots in no time. Most anglers try to get by with an ordinary brass snap-swivel. Eventually, they discover that the only way to keep line twist at bay is to use a premium-quality, ball-bearing swivel.
The larger the blade that is used on a ‘crawler harness, the more critical it becomes to use top-quality, ball-bearing snap swivels when fishing these popular live bait rigs.
 Crankbaits
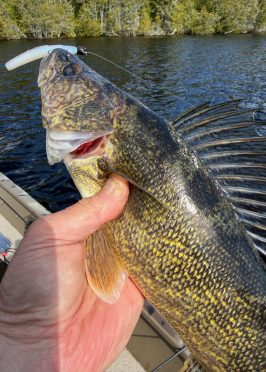
Casting or trolling, the only practical way to attach a crankbait to a fishing line is with an appropriately-sized round snap. A swivel is never needed when fishing a crankbait; in fact, using snap swivels for crankbait fishing can impact negatively on the lure’s action and also make it a nightmare to tune lures as needed to keep them running straight in the water.
I recommend using a No. 2 or No. 3 round, Cross-lok-style snap for most crankbaits. The No. 2 is ideal for walleye and bass fishing applications. The larger No. 3 comes into play when casting for pike, brown trout, lakers and other larger fish species. When throwing large baits for muskies or stripers, a No. 4 snap is required.
A few crankbaits come factory-supplied with a round snap as the connection point. In this case, tying a round snap to the main line and attaching a snap to a snap is the best option. Most lures that use a snap as a line tie option are wide-body baits built to have a lot of aggressive, side-to-side wobble. The Yakima Bait Mag Lip is one such lure. When we fish these baits, we run a snap to a snap; it’s amazing how much extra action these lures deliver with this termination option.
Lipless crankbaits
Lipless cranks like the iconic Bill Lewis Rat-L-Trap generate ultra-tight actions and a rattling buzz that can drive fish nuts. The actions of these lures are surprisingly delicate and easily altered.
Hardcore anglers who throw lipless baits may argue that the only way to tie them on is to use a loop knot tied to the split ring of the bait. A loop knot allows a lipless bait to achieve maximum vibration and rattle. The down side of a loop knot is that most anglers can’t tie one. Secondly, to use a loop knot, you have to be pretty in love with both the bait and the bait color selected. It simply isn’t practical to be switching out lures quickly when using a loop knot.
You can be among the first to get the latest info on where to go, what to use and how to use it!
The best compromise to the loop knot is using a small, round-nosed, Cross-lok snap at the terminal end. A No. 2 size snap works well with 1/2-, 5/8-, and 3/4-ounce lipless baits.
Blade baits
Blade baits are fished aggressively. Many blade baits come with a factory-supplied snap that can be moved into one of three different holes provided to influence the bait’s action. Tying the main line directly to this snap is a good idea, but switching out lures and lure colors becomes an issue.
Some anglers get around this issue by putting a split ring on the blade bait and then tying a small, round snap onto their fishing line. This setup gives a blade bait freedom to wiggle and vibrate as designed, yet it’s still easy to switch out baits as necessary.
Blade baits are commonly fished on superlines with a shock leader of fluorocarbon line added. In this case, it’s very important to make the fluorocarbon shock leader two or three break-strengths heavier than the main line. The stiffer line on the shock leader will prevent the blade bait from constantly catching on the leader.
Jerkbaits
Jerkbaits, or what some anglers refer to as stickbaits, are designed to deliver a lot of action as the bait darts and changes direction. Hardcore bass anglers will tell you that the only way to tie on a jerkbait is with a loop knot.
I’d argue that the ability to change lures quickly favors the use of a small, round snap at the terminal end of the fishing line. Since most anglers have not mastered the loop knot, a small snap solves a lot of issues in short order.
Bladed jigs
Bladed jigs are among those lures that fish best when the main line is tied directly to the snap or wire connection point that comes on these baits. Hooking a snap to a snap just increases the opportunity for these baits to catch on bottom debris.
Like other jigs, a stealthy connection point with the line tied directly to the lure is the best option.
Spinnerbaits
A typical, bass-style spinnerbait is designed to be tied directly to the line. Many spinnerbaits are made in such a way that the line tie location is simply a bend in the wire. Others are made by twisting the wire into an eye. In both cases, tying the main line directly to the spinnerbait is the best option. Any additional hardware is only going to catch on grass and other debris in the water.
Tube baits
When fishing tube baits and other bass-style plastics, it’s always best to tie the main line directly to the jig hook, or to the wide-gap-style hook that best suits the style plastic being used. Additional hardware in this case will impact negatively on the action of the plastic and simply catch on grass and other debris.
Trolling and jigging spoons
Spoons can twist up a fishing line faster than you can say, “Holy line twist, Batman!” A good-quality, ball-bearing snap swivel is the only logical way of fishing trolling spoons. I like to match up small spoons with small swivels. For example, when I’m trolling a Wolverine Tackle Jr. Streak spoon, I use a No. 2 ball-bearing snap-swivel. Larger spoons like the Standard Streak or Magnum Streak are more often used for larger species like salmon and are best fished on a No. 3 ball-bearing snap swivel.
A jigging spoon is another issue altogether. Because they are often used for ice fishing where the water is very clear, it’s important to keep hardware to a minimum. Adding a small barrel swivel in-line about 18 to 24 inches in front of the jigging spoon works well. At the terminal end, tie in the barrel swivel; then, using a 24-inch length of fluorocarbon leader material, tie one end to the barrel swivel and the other directly to the jigging spoon. This creates a very stealthy means of fishing a jigging spoon in clear-water conditions.
Because it takes time to switch out spoon types or colors, many ice fishermen carry two or three different rods rigged up with different spoons so they can switch out baits quickly.
If the water is a little stained, a small snap can be added at the terminal end to make it easier to quickly switch out spoon colors and types.
Drop-shot rigs
A drop-shot rig fishes best when tied onto a fluorocarbon main line or a superline with a fluorocarbon shock leader. The drop-shot hook has to be tied into the fluorocarbon shock leader using a Palomar knot. The line is then run back through the hook eye to secure the hook on the line with the hook point up.
The market is flooded with drop-shot hooks that have a swivel on each end to make for easy rigging. Some anglers believe that the added hardware destroys the subtle action that only a drop-shot rig can deliver. Learn to tie on a drop-shot rig properly and you’ll be amazed how well this rig works when targeting smallmouths and other species in clear water.
Summing up
Fishermen are constantly tasked with tying on lures and all sorts of terminal tackle. The “one method works for all” mentality just doesn’t cut it when it comes to getting the best performance from common fishing tackle. Well-rounded anglers should take a critical look at the art of terminating all their favorite tackle.
Did you enjoy this post?
You can be among the first to get the latest info on where to go, what to use and how to use it!
