DIY Fun with Fishing Lures
One positive for me that came out of the COVID lockdown was discovering a passion for making rusty, damaged, junk-drawer fishing lures new. It began when a friend gave my wife a box of unused enamel and gel coat nail polishes. Don’t bail yet; it can be done with a novice’s hand like mine. We had plenty of craft paints from old kids’ school projects and church clubs, so that wasn’t an issue, either.
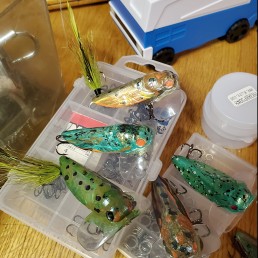
I had acquired an old tackle box from a friend with some crusty lures, garage/workshop homemade jigs and spinners to get me started. His mission was simple: “You’d know more about what to do with this than I would.” I sorted the “in need of help lures” from ones I knew should not be touched and reached out to MidWest Outdoors alum and old fishing tackle whisperer, Dan Basore, from the Historical Fishing Display.
After sorting, I had a few older, Fred Arbogast Hula Popper lures and some jigs, all with varying levels of paint damage, wear and rusty hardware. No problem for someone who has patience, cleaning supplies and a wealth of color choices.
Hardware was removed from the Hula Poppers and placed in a round painter’s pallet. Each piece was cleaned with 0000 grade steel wool, including original hooks when possible. A super-fine sandpaper will also work here and on your lure bodies. Small, detail steel, brass and plastic bristle brushes were found at Harbor Freight.
Next, wipe the baits with a clean, damp paper towel and allow to dry. If the hardware was too far gone, I found similar replacements on Lure Parts online. Replacement rubber, silicone or vinyl skirts were sourced from local tackle shops, big box stores and online.
Matching shades of either paint or nail polish were used for the mouths of the baits and bodies, applying several finish coats of clear or color coatings. Michaels Stores have a few topcoats that have different contrasting shades that really make the finish pop in sunlight. I highly recommend the “Dragon fly” ones. Artist brushes are also available there, with a host of other items. I ended up with some decent and serviceable fishing lures ready for the water or display, but that’s not all.
The next iteration of this hobby found me looking online and going to garage sales for lures in a similar state. The fire was now lit, and the flames needed fanning. I began to strip down baits that were beyond touch-up and refurbishment, thus unlocking the artistic license to create my own patterns.
You can be among the first to get the latest info on where to go, what to use and how to use it!
At this point, it’s important to say that if you like it and fish with whatever you create, keep doing it. Don’t let stereotypes ruin your fun. I had to decide, “Do I strip a rare Hula Popper down to the plastic, or work with that crazy purple hue still present?” Since the lure had lost most of the old luster and showed “battle damage” from fighting fish, I compromised. I added some other trippy, psychedelic colors and made it into a VW Hippy bus tribute for my daughter, complete with a peace sign on the belly.
Since then, I’ve been adding a clear, motor oil and “dragonfly” translucent topcoat to most every black lure that I own. It adds a sheen that doesn’t affect fish seeing the silhouette in low-light conditions.
Blank lures can be purchased from a variety of outlets like Janns Netcraft, Lure Parts Online, and other online sources if you’re so inclined. They come as a blank canvas in your favorite shapes, sizes, and weights, ready for you to put your custom design on it. Last year, I was turning out custom-painted cicada lures by the dozen during the “Cicadapocalypse.” Both the periodical and annual color tones in hand painted and nail polish varieties were met with fury from numerous fish.
The secret with the nail polish is to always make sure to cure a gel coat with a UV light and seal with a compatible topcoat—repeatedly. The same applies for acrylic and enamel paints and polishes, and they can be sealed with a spray clear coat to protect your creations for years to come. Lastly come the fresh hooks and split rings to complete our lures.
Through trial and error, you’ll discover what works, what sticks—literally—and what needs to be changed. With a little practice and patience, you can easily get started making your DIY lures into fish-catching creations.
For more insight and tips for fishing throughout the year, check out the articles in every issue of MidWest Outdoors, available by subscribing on our website.
MWO
SHARE THIS POST
Did you enjoy this post?
You can be among the first to get the latest info on where to go, what to use and how to use it!