Tip-Ups: Positioning and Rigging Strategies
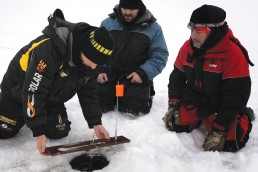
A knowledge of fish-attracting lake features allows Tom Gruenwald to position and rig his tip-ups for maximum effectiveness.
I love sports and the challenges each presents.
One of the most interesting facets involves strategic defensive and offensive play sets. Take your pick—football, basketball, soccer, baseball—all have players filling designated positions, each shifting slightly depending on the situation and the called or anticipated play.
Tip-up fishing can be viewed similarly. Although the number of “players” (i.e. tip-ups) varies given how many anglers are in your group and the number of lines each is legally allowed, like a sporting event, there are standard position sets. To remain increasingly effective, however, placements must be strategically adjusted as the game progresses, depending how our opponent (i.e. target species) appears to be responding.
Effective sets begin with good quality coverage of a primary fish-attracting feature—say a prominent shoreline point. Start by placing some tip-ups directly on the shallow flat at the head of the structure. These should not be random placements, but decisively positioned around fish-attracting features including bottom content and depth variations along inside weed lines, openings and edges surrounding vegetation and fallen trees, or a dredged channel leading to a dock.
Coverage should continue with tip-ups positioned along the outer edge where that flat begins breaking into the adjoining drop-off, with placement favoring distinguishing contour turns. If distinct cover or depth variations can be identified between your shallow sets and these “edge” lines—in effect, creating spots or paths fish might relate to while moving between them—positioning units along such lanes is always a favorable strategy, too.
Next, set additional units directly over the break, focusing on inward cuts, extending fingers or similar features fish might follow between your “edge” lines and deeper water. Set some units at the base of the drop where the point or such configuration converges into the deeper basin—perhaps with another line or two suspended out over deeper water. The extent of this coverage is limited only by the number of anglers in your group and the number of lines permitted per person.
You will now have established a coverage grid with tip-ups strategically placed on the flat, along probable migration routes leading toward connecting lines set atop the adjoining break, and continuing along pronounced secondary cuts, fingers or turns on the break itself before stretching into the adjoining deeper basin. Monitor each closely, re-positioning and shifting positions as patterns become apparent. If a tip-up set over a turn on a 14-foot weed line is getting steady action, for example, consider re-aligning others horizontally over similar features along that same contour.
Also consider how far beneath the ice each of those lines is set. In shallow water, a general rule is to favor setting your presentations high. Since shallow water often contains relatively heavy cover, positioning your presentations just beneath the ice ensures your bait will remain above it, visible to hungry predators searching for easy targets.
As you work deeper, sets can vary anywhere from just a foot or so under the ice to a third or halfway down, with others in closer proximity to bottom, depending on the situation and species being sought. Remember, your goal is to be sure your grid covers as much area as possible, both horizontally vertically.
A couple important side notes: First, when fish are fussy, less presentation movement may be beneficial. One simple way to reduce movement is by pegging your sinker(s) closer to your bait. This, in effect, either helps “anchor” them in place, or forces them to create fish-attracting motions when making any effort to escape, presumably tiring themselves in the process and ultimately, becoming more vulnerable.
You can be among the first to get the latest info on where to go, what to use and how to use it!
Another important item of consideration involves stabilizing your tip-up line guides. Premium underwater models like HT’s Polar have line guides fit loosely around the center tube mechanism—a deliberate design allowing them to turn smoothly in the direction of biting fish.
However, left unsecured in this fashion, a potential issue may occur, particularly with larger live baits: The minnow may swim outward in the direction opposite to the way your line is spooled—meaning that as the bait pulls line, the guide turns backwards, independently of the spool and without tripping the flag, thus potentially moving out of position without your knowledge.
To eliminate this, use those Polar line guide pin clips! Many anglers question what these are for—and this is the intended application:
Once your presentation is set, slipping this clip over the line guide base limits its rotation to no more than one revolution before the guide arm meets the clip. This stops any further rotation and thus prevents your bait from moving out of position or burrowing into cover. Once the minnow has stripped a full revolution of line, it either must stop or retreat. Should it try to continue, the flag will trip, alerting you of the situation and providing the opportunity to properly reset that presentation.
There are also circumstances requiring special rigging to maintain depth control—the presence of current being one example. Unaccounted for, currents may easily sweep your presentation out of the desired position. The obvious way to counteract current is adding weight—but this must be done carefully.
To avoid increasing resistance that might cause drops from light-biting fish in relatively light currents, “stacking” split shot a spread distance apart up the line is often enough to do the trick. As currents become progressively stronger, increasing the size of those shot and reducing the distance between them and your bait is helpful. Stacking them with the heaviest on top and progressively smaller ones extending down can also be effective.
Stronger currents require heavier weights or sinkers—but again, too much may cause fussy fish to sense something is wrong and drop your bait. The solution involves slip sinkers. Lowered to bottom, they provide the weight necessary to properly position your presentation while still allowing wary fish to pull line freely with minimal encumbrance.
Standard egg or bass cast sinkers function in this capacity, too, as will pencil or walking style sinkers. Simply slide the desired slip weight over your tip-up backing, followed by a barrel swivel to attach the desired leader. The weight will hold your bait in position, but because your line slips freely through the eyelet, biting fish won’t feel a thing when they run.
To gain depth control and keep current from pushing baits down behind your slip sinker, try using a floating jig head. These not only add lift, but a hint of color—and as an additional bonus, currents below the ice seldom maintain constant velocity or direction, and this erratic ebb and flow often causes floating jig heads to bob, creating attractive, strike-triggering motions.
Like what you see? Get even more awesome content by subscribing to MidWest Outdoors on our website.
MWO
SHARE THIS POST
Did you enjoy this post?
You can be among the first to get the latest info on where to go, what to use and how to use it!